We remain fully operational. Our teams are working around the clock to ensure your deliveries continue safely.

DOWNLOAD THE APP


Customer Services
Copyright © 2025 Desertcart Holdings Limited
DOWNLOAD THE APP

🎮 Level up your retro arcade build with pro-grade LED power!
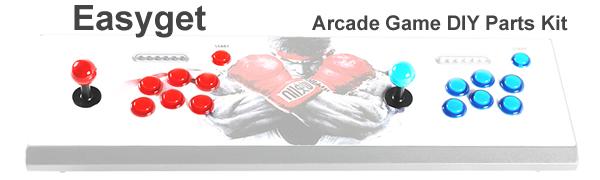
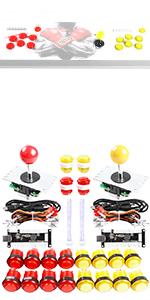
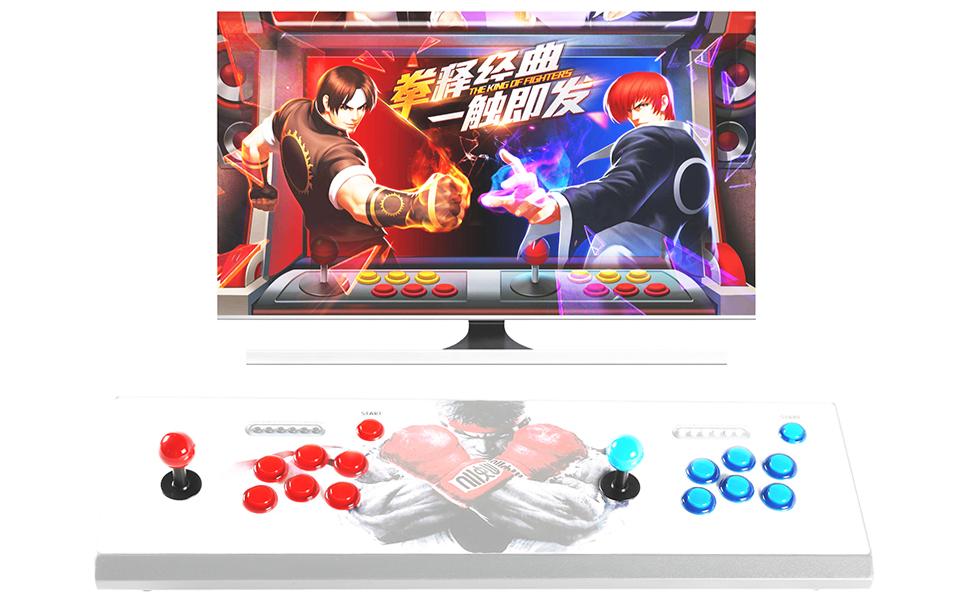
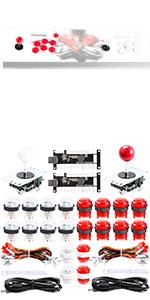
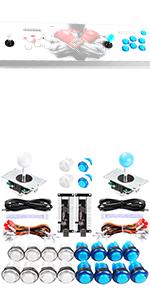
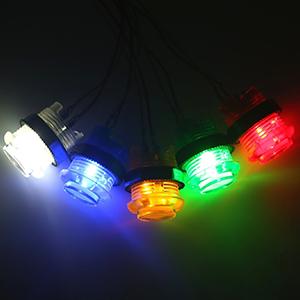
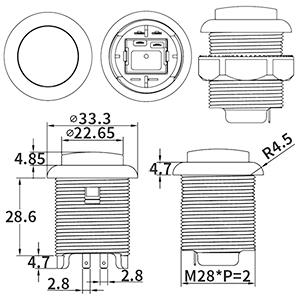
This Easyget LED Arcade DIY Kit includes 2 zero delay USB encoders, 2 professional 8-way joysticks, and 20 LED illuminated push buttons in red and blue. Designed for 2-player MAME and JAMMA arcade projects, it offers plug-and-play compatibility across Windows, Mac, Linux, and Raspberry Pi platforms. Crafted with heat-resistant, high-quality materials, this modular kit ensures precise control, vibrant lighting, and easy installation—perfect for millennials craving a nostalgic yet cutting-edge gaming experience.


| ASIN | B00WAY9848 |
| Additional Features | Ergonomic, LED Illuminated, Modular |
| Best Sellers Rank | #14,983 in Video Games ( See Top 100 in Video Games ) #749 in PC Game Controllers |
| Brand | Easyget |
| Brand Name | Easyget |
| Button Quantity | 20 |
| Color | Red + Blue Sets |
| Compatible Devices | PC, Playstation 3, Windows |
| Connectivity Technology | USB |
| Controller Type | Button Control |
| Customer Reviews | 4.4 out of 5 stars 490 Reviews |
| Hardware Platform | Desktop, pc |
| Item Dimensions | 8.27 x 4.33 x 5.51 inches |
| Item Weight | 2.16 Pounds |
| Manufacturer | Easyget |
| Package Quantity | 1 |
| Power Source | Corded Electric |
| Special Feature | Ergonomic, LED Illuminated, Modular |
| UPC | 711707969308 |
C**E
Great product that's easy to assemble, even for beginners.
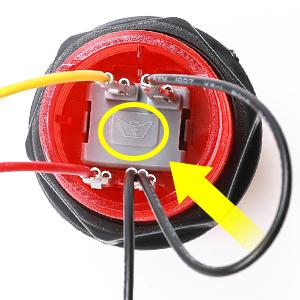
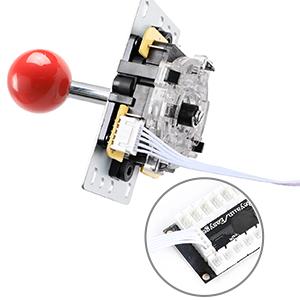
I ordered this set for the retropie powered bartop arcade we were building and I'm very happy with the results. I like the clicky feedback from the joysticks, how bright the LEDs in the buttons are, and how easy these were to put together. They perform well in all of the games I've played so far, including games on NES, SNES, and MAME. Now, that being said, I did a LOT of reading reviews and researching configuration issues with these controllers before/after buying these in preparation of my cabinet's final assembly. I learned a ton from other folks who used these before me, which is why I think the final steps of my build went so smoothly. If you're looking at these for your own retropie arcade, I thought I'd leave some helpful tips in this review for my fellow DIY-ers. First, like other reviewers and the seller have mentioned - when wiring your buttons pay attention to the crown logo on the back. With the crown logo facing the correct way, your red wire connects on the lower left post, your yellow wire connects on the upper left post, and your black wires connect to the posts on the right side. Once the wires are fully connected to the buttons' posts, they're extremely difficult to remove, so be sure you've got the right order before connecting them fully. Second, I recommend testing your joystick's orientation before you secure it to your controller board. When you first connect the joystick/buttons to your retropie, you'll be asked to configure your controller inputs. During this configuration it's possible for your backwards joystick to be configured to work correctly in the main UI, but still be backwards in retropie configuration, which I read can cause issues when using certain emulators like ones for MAME. This happened to us, and we had to unscrew the joysticks, flip them 180° and re-secure them to the controller board. Don't just test in the main screen of retropie - go all the way into retropie setup (like where you go to get new themes, perform updates, etc) and make sure your directional movements are correct. Third, if you're planning on using both sets of these at the same time for 2 player games, pay attention to how you're connecting your buttons to your encoder. If you look on the back of your USB encoder board you'll see notations where the buttons' wiring connects on the board. Mine were labelled ST, SE, K1, K2, K3, K4, etc. Connect the buttons to these slots: your start button should be connected to the slot labeled ST, Select goes to SE, A goes to K1, B to K2, X to K3, and Y to K4. I did use all of the buttons in this kit, so I also connected L to L1, R to R1, P1 coin to L2 and Player 1 Start to R2. For player 2 it was the same: Start = ST, Select = SE, A = K1, B = K2, X = K3, Y = K4, L = L1, R = R1, P2 coin = L2, P2 start = R2. The user I read this info from stated to be absolutely sure you connect both player 1 and player 2 button sets on the exact same slots on each encoder to avoid configuration issues. I'm not sure if this is still necessary (the forum thread was from a year ago) but it's how I wired mine and had zero configuration issues. Note: some MAME emulators default map your coin and P1/2 start buttons to your regular start and select buttons. If you're planning on using separate coin and P1/2 start buttons for MAME games like I did, you'll likely need to do additional configuration within the emulator. I'm using lr mame2003 and this is what I had to do to get my extra buttons working for coin/start. Fourth, I also read of potential configuration issues due to which USB ports these controllers are plugged into on the pi/USB hub. I'm using a powered, 7 port USB hub which is what I've connected my controllers into to avoid power strain on my pi. Looking at my hub, I plugged my P1 encoder into the left-most port, and my P2 encoder was plugged into the slot right next to that one. I also have dual USB ports for additional peripherals/device charging on my cabinet, and those were plugged into the next slots on my hub. I have my wireless keyboard dongle plugged into the Pi's USB slot '0' and my hub plugged into the Pi's USB slot '1.' Again, not sure how necessary this is, but I read of potential issues with the pi not correctly recognizing which controller was P1 and which was P2 due to which USB port each controller was plugged into. I connected mine in what appeared to be a correct numerical order, and again, zero issues doing it this way. Those are the big things I can think of, but one last tip: after getting my buttons onto my controller board, I used small labels on each wiring harness to label which button it was (start, select, a, b, x, y, etc) on the end that connects to the encoder. This made it wayyy easier to connect each button to its board in its correct slot without having to trace it back to the button itself. Plus during wiring I was pretty much looking at everything backwards from the inside of the controller board, so it made it easier to keep everything straight when connecting to the encoder. Overall, very happy with this set. My arcade works great, and I have had a ton of fun playing with it.
R**C
Great price, good build quality, easy installation
Works perfectly - as expected. I used this with a Raspberry Pi 3 (which I also got on Amazon) - installation is very simple, just plug in the USB controllers to the USB ports and the devices will automatically be recognized as Dragonrise USB Generic Controller. Word of caution when installing, make note of the pin connection plugs - if you pull them off the PCB. I did this when wiring and hooked them up wrong. It does not break anything, but you will notice the controller will not respond as expected, I had to flip the connection and all worked again. There is plenty of wire for various configurations. Note about wiring, make sure you wire as per the included instructions, it is not clear so I put an image I found that clearly shows the connections. If you do not get a lit LED your connections are wrong, if you get a lit LED but the light goes out when you press the button, your connections are wrong - just rewire. I am very happy with this purchase.
S**N
easy to assemble & get working
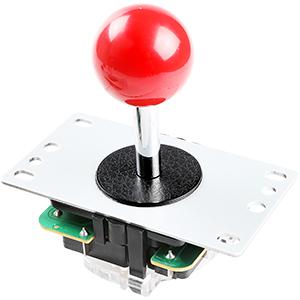
When building an arcade emulator using a RaspberryPi with HDMI display, this kit is a very simple way to be up-and-running with credible arcade-quality controls without a lot of fuss. The wiring harnesses make plugging the buttons into the encoder board very simple. Another reviewer here mentioned the importance of paying attention to the crown logo on the bottom of the button for orienting it to the diagram in the instructions. If you pay attention to that, there's really no way to mess up the wiring. I do take one star off because one of the crimps for ground keeps pushing out of its connector, and if people are having trouble with a button 'not working' I would advise them to triple check that no crimp has pushed out of its housing. On the other end, the wiring can plug into any which pins on the encoder. No order is important because you're going to configure it in the emulator. Speaking of which, I was able to launch MiniCakeTV (RecalBox) image from ArcadePunks and it recognized the encoder board and the config at startup was simple. The joystick is sufficient. The people criticizing the length of these joysticks are using thick MDF for their control panel. I'm using 1/4" and the joysticks protrude just fine. The other criticism here is the poor action on the buttons. I agree there. These are not click-responsive like a real Happ button. Something to consider for future upgrade would be to change out the primary 'fire' button for a real Happ button and keep these cheaper buttons for secondary, tertiary, etc. Finally, I'm not into the traditional fighter games, so I didn't mount all eight buttons in two rows of four. I went with three in a row next to the joystick. I installed the smaller buttons for navigating the UI for coin insertion, game start, etc.
W**K
Great buttons and controllers
UPDATE: Bought another set of these, works even better than the last set! I built a bar-top cabinet first. I was somewhat disappointed that the buttons didn't remain lit at all times. I ordered another set in Dec. after having found an empty cabinet sitting by a dumpster. So I converted it to a RetroPie arcade and it is so awesome! Buttons remain lit at all times, using the same wiring instructions used in the attached image. This time around, I did a lot more to the cabinet with my son's help. We added some better looking artwork, added external USB and audio output (to headphones). Very happy with this kit! Attached are a few pics of my cabinets. ORIGINAL REVIEW: Last weekend I built a cabinet and installed this kit. Initially, I had some buttons that remained dimly lit (but worked) and others that were unresponsive. I e-mailed support and they very quickly showed me what I had done wrong with my wiring. The instructions that are included in this package do not demonstrate that you should look to the small logo on the bottom of the button to determine the correct orientation for the wires. It does matter! After my e-mail to support, EVERYTHING is working perfectly. I'm going to attach the main image here that they sent me to help others with their wiring. If you follow this, you'll have no issues too! Great package, but the instructions need to be included. I will definitely be buying again if I build another cabinet.
A**A
Great for a RetroPie setup
During the COVID shutdown, I needed to distract the children while I worked from home. This set and some plywood, paired up with a raspberry pi, offered a great distraction. My daughter was able to make an arcade style cabinet (3 days of uninterrupted work for her and for me :-) ), and now she and her brother are in front of that screen for significant periods of time (but not nearly as many hours as I spent in front of Rampage as a youth). The buttons have a nice feel to them, though they are not "clicky" like high-end gaming keyboard keys. The joysticks work as they should. The photos with these reviews show everything very well. The jumper cables connect everything together easily, and the two USB boards were recognized immediately by the most recent version of RetroPie. Having read some reviews about the LED lighting over-taxing the raspberry pi power source, we have these going into a powered USB hub in the arcade cabinet. The LED button lights are certainly not dim! All together, this delivers exactly what is advertised. More expensive buttons are out there which have the "clicky" feel when they're depressed, but, compared to this solid offering, I'm not sure they're worth it.
P**K
Easy setup
I created an arcade over a year ago and these buttons and joysticks are still working perfectly. The setup was extremely easy, with basically a plug and play configuration. I used a Raspberry pi 3 B+ to run the app. Originally I was going to create a full size unit, but figured that I would get more use out of a table top unit and I am glad that I did. I can now move it to where ever I want. I can even take it to a friends house. What I also did was create a base to put the unit on, so I can easily move it around my house. I used a 27 inch flat screen monitor as the display unit and placed a plastic shield in front of it, so when the kids use it and touch the screen I just have to wipe it down. I also added a USB port on the front, so I can easily hook up other types of joysticks, or a keyboard when programming the unit. The pi does have Bluetooth capability so blue tooth units can be used. You can even use a firestick if you just want to use it as a TV. For example, I use it in the backyard from time to time to watch a movie and get out of the house. I used a mini audio amp for the sound and some car speakers. I can now adjust the sound easily, and plug in any outside audio devises that I might want to listed to.
A**.
Things to consider.... Not the best solution.
Not a bad kit for an Arcade DIY. However, there are a few things to consider: 1. Connecting wires are too short 2. Joystick is too short for fighting games (I used 3/4" MDF) 3. The ball stick isn't very good for fighting games. You are better of doing the American style stick 4. The two extra buttons are smaller per controller are smaller I ended up buying the joystick extenders and extra P1/Coin buttons so my investment ended up being $200+ (you need raspberry pi $50, monitor and speaker $75, cables, SD card, MDF, and your time to build it).
A**U
Way Better Than You'd Think
This is my third or fourth time I've made a custom arcade controller, and I was originally going to do what I had before and purchase the American hardware that I was used to from Suzo Happ, and while I am happy to pay extra for quality they were basically screwing me over on shipping. I actually came here looking to see if I could get a better deal from an Amazon retailer, and this package basically blew me out of the water. For LESS than a single set of Happ controls, you get TWO COMPLETE SETS of joysticks and pushbuttons. Not only that, but the buttons include lights, it comes with wiring harnesses and two USB interface boards so you can get it running with just about everything out there with as little effort as possible. It even came with two USB cables, 1/2/3/4 player legend stickers, round restrictor gates to optionally install in the joysticks, and even a little paper with QR code links to all the information you need to make your arcade controller a reality. For the price I was expecting super cheap parts, but I'm actually really surprised at how good just about everything is. Almost every part is in it's own plastic bag so everything arrives with no scruff marks. The joysticks are particularly surprising, since they are clones of the arcade community's favorite Sanwa JLH. Heck, it might actually be genuine - the plastic parts actually have "SANWA" moulded into them. The pushbuttons are where it starts to get cheap, though as they are made by a Taiwanese company called Baolian. That being said, I need some more time to evaluate these buttons because they don't actually seem to be that bad. They are clearly emulating Sanwa's style of switches, and I'm more used to the American Happ style buttons with microswitches; they're all threaded, and they come in both 30mm and 24mm sizes just like Sanwa buttons, though they do use a switch mechanism that appears to be unique to them. If you were in a Microcenter while they were doing that big arcade kick, these are the brand of components they were selling. While I'm not quite used to them, they're actually not that bad; they have a decent throw, they don't stick, and they have enough force behind them that the buttons rise up quickly so you can mash the button very quickly if you need to. The only thing that really looks super cheap is the USB interface boards that it comes with, but I don't consider that a negative at all. The very fact that it comes with the wiring harnesses and they all snap into the board without any tools is a tremendous value in and of itself. Though I will say that the wires are relatively short, so if you're actually using this in an existing arcade cabinet that is widely spaced, they may not be long enough. The interface shows up as a Dragonrise Inc PC Twin Pad and sadly there is no option to control how the LED lights work on it. If I were to guess there is no software control and the connectors are hard-wired to keep them on whenever there is power to the board.
Trustpilot
1 week ago
2 weeks ago