We remain fully operational. Our teams are working around the clock to ensure your deliveries continue safely.

DOWNLOAD THE APP


Customer Services
Copyright © 2025 Desertcart Holdings Limited
DOWNLOAD THE APP
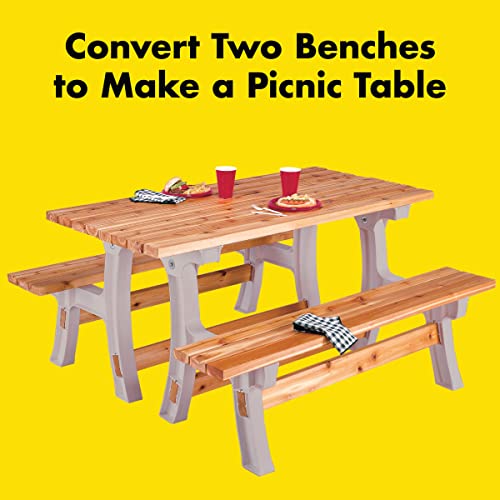


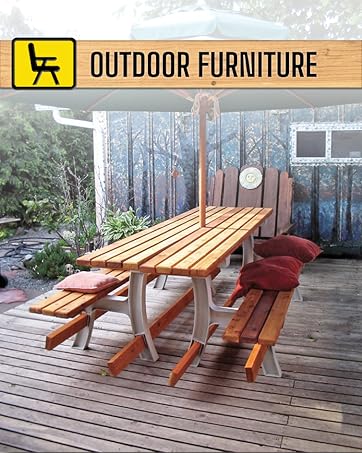
🔄 Flip it, sit, dine, repeat — the ultimate space-saving outdoor essential!
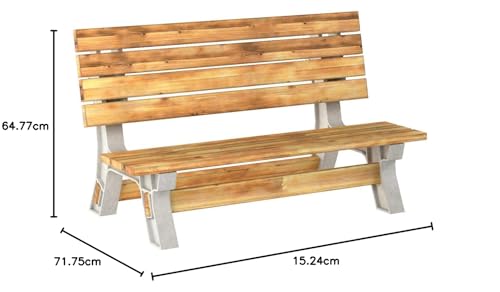
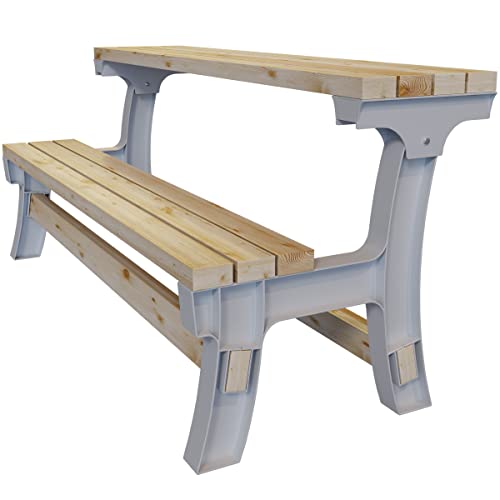
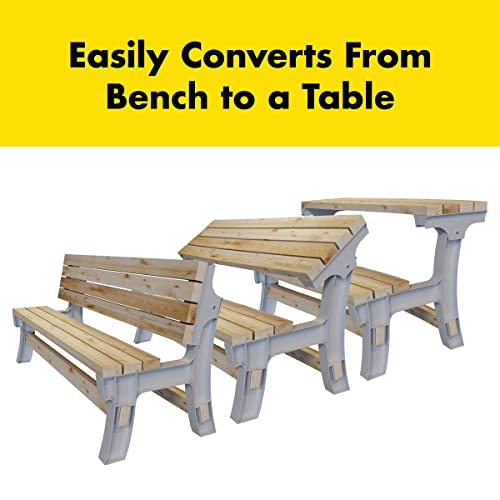
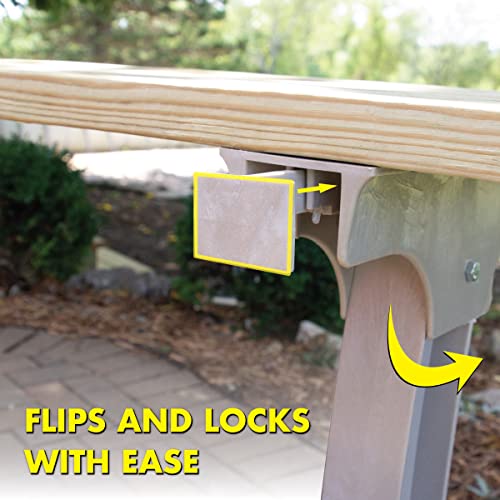
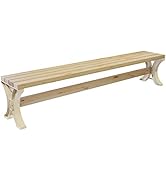
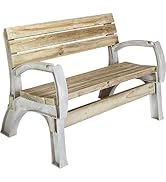
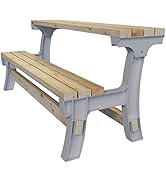
The 2x4 Basics Hopkins 90110ONLMI Flip Top BenchTable is a versatile outdoor furniture piece that converts effortlessly between a bench and a table using a patented slide lock. Crafted with a durable structural resin frame, it withstands all weather conditions and supports up to 113.4 kg. Designed for customization, it fits wood lengths up to 8 feet (lumber not included) and assembles quickly with common tools, making it ideal for picnics, garden parties, and flexible outdoor seating.

| ASIN | B0015XGCN0 |
| Base Type | Leg |
| Brand | 2 X 4 BASICS |
| Colour | Brown |
| Country of Origin | USA |
| Department | unisex-adult |
| Frame Material | Wood |
| Furniture Finish | Wood |
| Generic Name | Flip Top BenchTable |
| Included Components | 2 bench end brackets, 2 pivot brackets, 2 slide locks and all of the hardware needed to assemble the product |
| Indoor/Outdoor Usage | Outdoor |
| Item Weight | 5 kg 900 g |
| Item model number | 90110ONLMI |
| Manufacturer | Hopkins Manufacturing Corporation |
| Maximum Weight Recommendation | 113.4 kg |
| Model Name | 90110 |
| Net Quantity | 1.0 Count |
| Product Care Instructions | Wipe with Damp Cloth |
| Product Dimensions | 71.8D x 15.2W x 64.8H Centimeters |
| Recommended Uses For Product | Fleet and plant maintenance. |
| Seating Capacity | 8.0 |
| Shape | Rectangular |
| Size | 6"D x 28.25"W x 34"H |
| Style | Flip Top Bench + Table |
| Table design | Picnic Table |
م**ى
الطلبية ناقصه لا يوجد خشب هاذي ثاني مرة اطلبها والطلبية ناقصه للأسف
N**Y
We bought 2 of these benches in spring last year and have been delighted with them. We chose to stain the wood and both timber and frame have survived the winter and look as they did when first put together. We are always complimented and asked for purchase details by our guests so they can buy too. The benches took me (lady of adequate assembly ability) 30- 45 mins each to assemble. I would definitely recommend painting/varnishing your wood before putting the bench together. Our wood was obtained by a local timber merchant who cut it to our desired length. I think it can be anything from 2ft to 12ft? Anyway we chose 4ft. £20 for the lot. Benches work well as a picnic bench when we are eating outside as a family and also work well separately as benches (with a backrest) for seating when we've had garden parties. My husband is 6ft 4 and sits comfortably when the table is up in the picnic bench position. Hope this helps you in your decision making.
H**Y
I gotta tell you, these bench kits are GREAT. For less than $50 bucks I was willing to give this a try. Home Depot had ground contact pressure treated 2x4's in 6 foot on sale for $3.75 each. Good pressure treated lumber, already cut to 6 foot. (Hot TIP: I know it says you can, but I wouldn't go with 8 foot wide. Not only does it make it really heavy, but it will be a little spongy in the middle). 6 Foot seems to be a perfect size. I loved the idea of it converting to a table AND putting 2 together back to back for a full size picnic table. But would it really work "as advertised", be stable and nice looking. Yes, yes and yes to all three questions. I used a neutral semi transparent 4 year stain/sealer on the pressure treated wood. You could use regular 2x4x6's, but you know what happens to untreated pine sitting outside 24x7x365. It will rot within a couple years. Pressure treated 2x4 rated for ground contact should be around a LONG time. Don't even need to stain it, so long as your ok with it going gray, and crack/checking a little. Mine is to accompany a recently built screen house with some outside seating, so I sealed it with the same stuff used on the screen house. I love this and it is just what I had in mind. The doubling as a table is perfect for my application. By the way, the mechanism to fold the bench back into a table works well and locks into place. Overall the unit seems very sturdy and should stand up to the elements well. A few building tips in the next paragraph if your interested. If your not going to stain or seal the lumber, no problem if its pressure treated lumber and you don't mid the fade to gray and some wood checking. 1) However if you do stain or seal the wood, sand it a bit first, or you'll need to wait until good and dry before you seal it. Just like a new deck with pressure treated lumber. Pressure treated lumber comes with a surface coating meant to hold in the penetrated treatment. Often stain or sealer simply won't stick or penetrate. A light sanding allows the sealer/stain to penetrate and still allow the boards to "gas out". While your at it hit the edges of the boards to give them a more finished look, rounding the sharp ends a bit. I couldn't stand waiting, so I sealed after putting it together and allowing a few days strong sun drying. 2) Pick out really straight and true 2x4's. Warped ones are a no go here. I found not all of my 6 footers were exactly the same length. Some were off by as much as 3/4". So I simply cut them to be certain all were EXACTLY the same length. Take your time putting it together so you have even flush ends all the way around. An extension on your drill/driver is helpful for getting it into a few of the tight places where screws are needed. The kit will be a 1-2 project on a project scale with 5 being hard. All you need is a drill/driver for pilot holes and driving screws, and a circular saw to be sure the boards are all the same length. If your careful picking out the lumber and find 6 foot pressure treated 2x4's, you may not need the saw. I have bought a second one and 9 more pressure treated 2x4x6.
W**Y
Very pleased, easy assembly, looks well easily adapts
A**R
The bench itself was simple and straight forward to assemble with some prep work ahead of time. The quality of the bench really depends on the time taken to prep the boards used as the frame is self is not too complex. I fully recommend getting a flexible drill attachment to get to some of the harder to access screw holes. As others pointed out the frame can break/bend at screw holes if the drill is too strong so I recommend just lowering the torque setting on the drill motor so it would just stop screwing in before bending or breaking the frame and it worked perfectly for me. I used some scrap wood to connect the top and seat boards together before attaching to the frame. Key there is to make sure you have the width of the top boards spaced to fully cover the frame attachments. I used an extra paint stir stick cut up as spacers, 3 sticks wide on either side about did the job spacing between each boards. When attaching the table I broke from the directions and did the support board first. Then laid the 3 board seat already connected upside down on a saw horse and set the frame on that so I could pre drill holes and then just screw in the seat to the frame. As for the top I laid down towels so not scrape the finished seat and tops paint job and leaving the frame unlocked but fully assembles to get the distance between the two frames measured perfectly rather than attaching the adjustment points while not on the frame. I could set it at an angle on the upside down top and mark every hole, pre-drilled then realign frame and screwed it in. I went with 5 ft 2x4 boards. I had the hardware store cut 5 10ft boards in half as it required 9 5ft boards to build. So all I had to do was sand and round the edges of the boards to give them a softer texture when sitting on the edge. I added wood filler to fill in any knots or imperfections and then painted them with a nice semi-gloss exterior paint to protect from water and wear and tear. Took me longer to sand, add wood filler, and paint the boards than it did to assemble the whole thing. I did notice a little squeak between painted wood and the frame so I wiped down the friction points with some finishing wax to "grease" the areas and it helped some so when sitting on the bench I don't notice much noise at all. Table and Bench work well in their respective forms and easily transition between the 2 just by pulling out the 2 locks on either side. Its a fun easy project and if I ever build a second one I can have socially distant picnic tables during quarantine in 2020 and beyond. I liked the blue color so much it took me a day before I wanted to put it outside in the rain but the semi-gloss let me wipe down the table easy. Might be nice for interior as well in rooms right up against windows where you want to work at a table while looking out but then fold down to a bench when you have company inside. Good minimalist functionality in my opinion. I like products that can serve multiple functions with minimal effort transitioning or moving them.
Trustpilot
2 months ago
3 weeks ago