Desert Online General Trading LLC
Dubai, United Arab Emirates
Desert Online General Trading LLC
Dubai, United Arab Emirates


🏖️ Dive into Clarity with Every Swim!
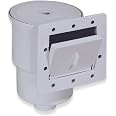
The Swimline Hydrotools Grey Standard Thru-Wall Above Ground Pool Skimmer Kit is engineered for effective debris collection, featuring a durable ABS construction, easy installation, and versatile compatibility with various pool types. With convenient access points for maintenance and a user-friendly snap-in weir, this skimmer kit ensures your pool remains crystal clear and inviting all season long.


P**R
Install to a. 8 x 12 4 ft vinyl pool canvas thickness
I used this on my vinyl above ground pool o just carefully cut out the shape needed after marking it with a sharpie cut it out used a exact knife cut the holes out too little difficult lining up the bolts and I had to cut them off a little because they would tighten all the way I think it’s intended for a thicker sided pool and mines just like canvas thick but I bolted it down going around like a tire and it is great I put a piece of block styro foam between it and the wall so it would sit straight as the sides of my pool are rounded but it’s working fine good quality and product for a very reasonable price thank you
J**S
Great Upgrade for Intex Pool
I bought this skimmer kit for my Intex 18ftx9ftx52in Ultra XTR Pool Kit. I did not like how this pool had two under water inlets for the filter pump and no surface skimmer intake. I was having to net out a lot of surface debris like bugs and leaves that the under water inlets would not pull in. So I eliminated one of the under water inlets and plumbed that line to this skimmer and there has been a huge improvement. The basket was full of water beetles and leaves/debris within the first couple hours of running. Fairly easy to install, just take your time and double check everything before cutting a fairly large rectangular hole in your pool liner! There are some good youtube installation videos out there that are a big help if you watch first. I am also impressed with the overall quality/build of this kit. Hopefully it holds up in the harsh environment of sunlight and chlorine, time will tell...
K**K
Great product and read all directions before liner
MAKE SURE YOU PUT THE 4 SCREWS IN FROM THE INSIDE OF THE POOL BEFORE PUTTING THE LINER IN! Great product but missed the part about the screws from the inside before putting the liner in so just don’t do them.
A**R
Works as described
I was a little scared of cutting a hole in my pool like most. I did install it when the pool was full. If you install it when it's full use an ice pic to make the holes for the screws. Start by separating the two gaskets. Put one gasket on the inside frame and line it up on the inside of the pool where ever you wish so long as there will be water flow into the skimmer. I pushed the ice pic from the inside out. Please make sure YOU are not near the end of the pic or anyone else when piercing the pool. Install a screw so that you can move to the next corner making sure that the frame is level. Continue till all screws are installed. Once you have the frame screwed to the pool ,bring the skimmer to the outside of the pool. Back the screws out about half way. Match the the skimmer holes with the screws and start screwing them in loosely all the way around and the final tighten all the way around. Be careful as to not over tighten them and break the frame. There are two gaskets that will seal the water. Once you have completed the skimmer install, pipe up your skimmer back to to the pump. I used a 2" X 1 1/2" rubber coupling available at your choice of hardware store. You will need a valve to be able to work on the pump or remove for maintenance. Nows the time cut out that square you've been dreading to do. If it is leaking a little just tighten up around the frame until it stops. Periodically check to make sure all connection are tight. Good luck on your install, and happy swimming.
E**R
Good quality for the money!
Very good product! I’ll try to keep this short and sweet as others have mentioned some of the most important things already. Firstly the instructions are pretty good however...BE SURE AND PRESCREW ALL THE SCREWS INTO THE HOUSINGS!!! I did this as well and it did make it much easier to get the screws in once you have your holes punched. You’ll need a heavy duty screwdriver though (not sure of the size but something like a #8 or #9 ((large headed)). This unit works perfectly with the Intex return hoses! No need for an adapter the return hose slides right into the lower fitting that comes with it and the clamp fits very secure just make sure the hose is all the way on and your clamp is above the divot ring so the hose gets a good seal and won’t slide off.Don’t cut your pool “opening” until after you’ve screwed in all the screws VERY TIGHT. Also, the main housing uses 6 screws! 4 of them are kinda hidden way down in the top and bottom. I used a long handle pair of pliers to pre-install them on my workbench then used a manual screwdriver to torque everything in place (DONT FORGET YOUR GASKETS) the only issue I had was the Teflon tape that comes with this is junk. Don’t use it. Get some good tape for the bottom fitting. Mine leaks a little but not too bad. I’ll fix that later.I’m using an Intex 16” sand filter with a 1/2 Hp motor. Let me tell you...this thing sucks HARD! Don’t stick your fingers down on the suction hole like I did and almost lost a finger! Otherwise it began sucking everything that approached it amazingly! The plastic looks kinda cheap but is thick and pretty durable only time will tell if this thing holds up to the West Texas sunshine and heat!
L**M
Super simple setup up
I was kind of weary about changing out my skimmer that came with my pool when they said I would have to cut the liner however…..it was a breeze!, the amount cut was minuscule and it really performs well. Would definitely recommend!,, pictures of final set up and the pieces (tiny little bits)I had to cut to make rubber seal work properly
J**Z
Hydrotools Wall Skimmer is the WORST don’t waste Your Money
I really never do this but I am today so No One can spend there money on purchasing this wall skimmer. I give this hydrotools wall skimmer A 1 star and that’s because I had to give it something kind of rating but I wish I didn’t have to give it anything because this is the worst wall skimmer ever we installed the skimmer and did everything it asked step by step and it still leaks not only from the wall of the skimmer but also from the adapter that it comes with we even put teflon tape around the adapter it comes with and it still leaks I’m so upset that I even purchased this wall skimmer I wanna return it but dnt know if I can do so do to us installing it and putting silicone around it to see if it would help to STOP the leak but no that didn’t even help!!
Trustpilot
2 weeks ago
1 day ago
2 weeks ago
2 days ago