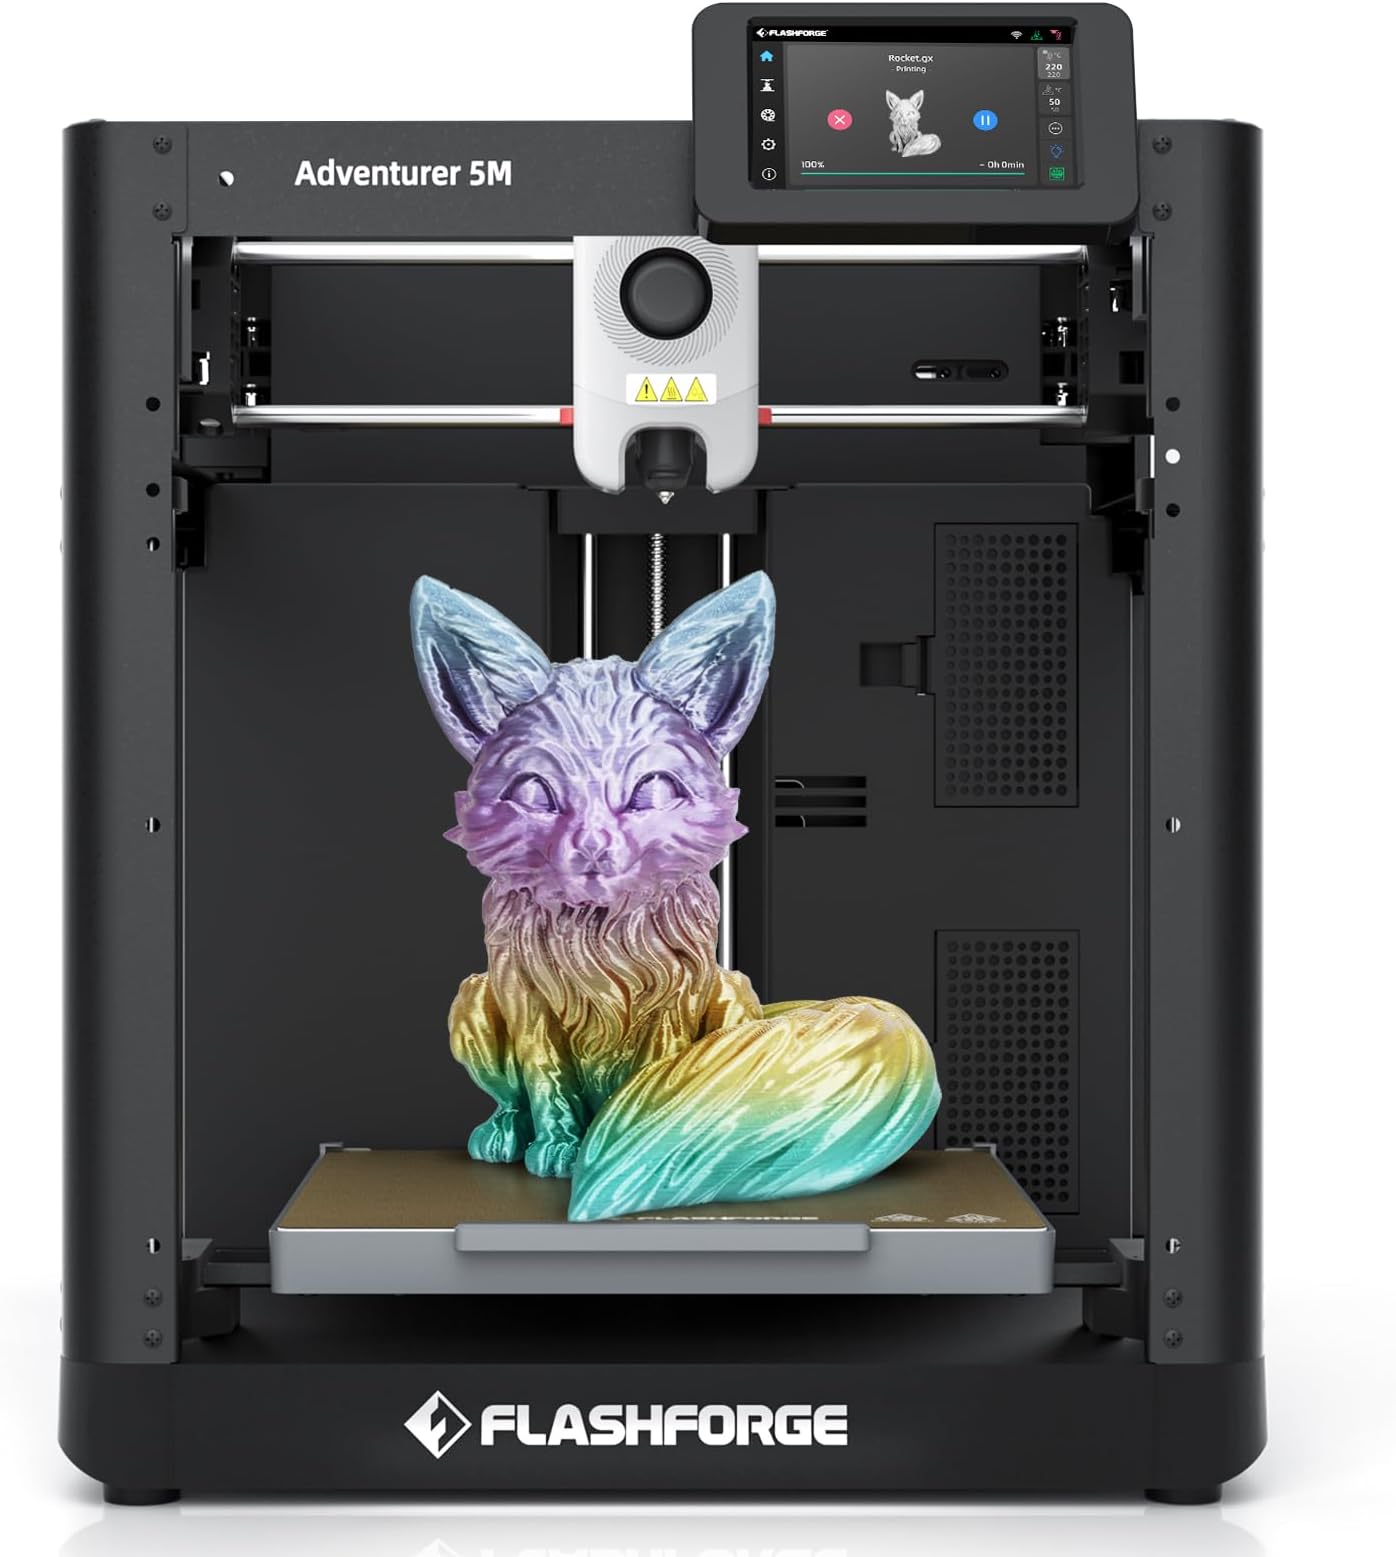

🎯 Unlock pro-grade multi-color 3D printing at lightning speed — because your ideas deserve the best!
The FLASHFORGE AD5X is a professional-grade multi-color 3D printer featuring a 600mm/s CoreXY all-metal frame for stable high-speed printing, a 300°C high-temp direct extruder for advanced filaments, and an Intelligent Filament System enabling 4-color simultaneous printing. It offers fully automatic bed leveling, vibration compensation, and a vibrant touchscreen interface. Ideal for industrial and commercial use, it supports remote multi-device management and is compatible with PLA, TPU, carbon fiber blends, and PETG filaments, delivering reliable, precise, and efficient multi-material prints in a 220x220x220mm build volume.


| ASIN | B0DNW25S87 |
| Best Sellers Rank | #2,954 in Industrial & Scientific ( See Top 100 in Industrial & Scientific ) #7 in 3D Printers |
| Brand | FLASHFORGE |
| Built-In Media | 10g*HS PLA *4, Display Screen*1;Spool Holder*4;Mounting Plate*1;IFS*1, FLASHFORGE AD5X, Power cable*1;IFS connection cable*1; 4-in-1 guide tube*1, Screw M3*6 *4;Cable Clip *1;Grease *1;Screwdriver *1;Allen Wrench Kits *1;Diagonal Pliers *1;Quick Start Guide x1 |
| Color | AD5X |
| Compatible Devices | Laptop |
| Compatible Material | PLA/TPU/PLA-CF/PETG-CF/PETG |
| Connectivity Technology | Ethernet, USB, Wi-Fi |
| Customer Reviews | 3.9 out of 5 stars 1,629 Reviews |
| Enclosure Material | Metal |
| File Format | 3mf/stl/obj/fpp/bmp/png/jpg/jpeg |
| Item Dimensions D x W x H | 14.29"D x 14.8"W x 16.26"H |
| Item Height | 16.26 inches |
| Item Weight | 11 Kilograms |
| Manufacturer | Zhejiang Flashforge 3D Technology Co., Ltd |
| Material | Metal |
| Nozzle Bore Diameter | 0.4 Millimeters |
| Nozzle Temperature Maximum | 300 Degrees Celsius |
| Operating System | Linux: support version Ubuntu 20.04 and later, Mac OS: support version 10.9 and later, Windows 7/8/10/11 |
| Printing Technology | FDM |
| Product Dimensions | 14.29"D x 14.8"W x 16.26"H |
| Voltage | 110 Volts |
| Warranty Description | 1 Year |
F**.
Excellent Machine
Short Story: I purchased the FlashForge 3d Printer Creator Pro in mid December 2014 and started using it on December 25th. I have printed ABS things that came with it, an ABS bicycle I created with SketchUp, and a wrench using PLA glow-in-the dark filament. Everything works great. This is a fantastic machine and technology. And I had a couple of questions and the legendary Tang answered the first email within an hour on Christmas Eve and the second email within an hour on Christmas morning (Central Standard Time). Great product, great service and the concept of 3d printing is really cool. Long Story: I got interested in 3d printing about a year ago and began shopping and reading web sites. I noticed that the machines were getting less expensive and per the reviews, more reliable. In early December I decided it was time to buy one and I suggested to my wife that I was going to do this and ‘it could be my Christmas present’. She said that was fine, but I could not open it until Christmas day. That was not what I intended but it turned out to be a good thing. For the 3 weeks or so before Christmas I read everything I could find about how to set up and use this printer. The first thing I discovered is that there is a lot of software involved, and three ways to get objects to the printer. First, you can download files from the internet. Second you can create an object then print it, and third you can buy a scanner, scan an object, and then print it. And you can combine elements of all of those. You could download a file, merge that with something you scanned, and then import that file into a 3D modeling software like Google SketchUp and modify it. I’m a baby boomer and we all learned things by reading the manual. Kids today never bothered with manuals so when they started inventing all this stuff they don’t bother writing manuals. You have to figure everything out by reading Customer Reviews and researching on the internet. Scanning. I purchased a Matter and Form MFS1v1 3d scanner. I wrote a review about it, so won’t repeat that here. It works. Create a Model of your own design. You have to learn to use a software program to do this. I selected SketchUp because there are good reviews and it is free. But there are no manuals. You load it on your PC, then work through 4 training tutorials provided by Google, then you just have to do google searches to try to figure out everything else you need to know to create an object that you can print. Here is what I learned about SketchUp essential to 3D printing: 1. Build your object in a large size, then let the printing software (more on that later) reduce it in size. SketchUp was developed as a 3d tool for architecture and lacks the ability to make very tiny parts. But you can make a big part with high detail then reduce it. 2. Every time you create an object on SketchUp – you must select it then “make a group”. Then you right-click and look at ‘Entity Info’. If you see ‘volume’ you have created a solid that will print on a 3d printer. If you try to print something that is not a solid the print software will discover “manifold” problems, and the print won’t work. 3. After you create solids, you join them together using a tool called “outer shell”. This is the tool on SketchUp 2015. I think tools on earlier versions had other names. You get to this tool by: View, Toolbars, Solid Tools. A bunch of solid objects joined together with ‘Outer Shell’ result in a model that can be printed. 4. When you first download Sketchup you get the Pro version (for 30 days). With the pro version you get other Solid Tools and you can output ‘object’ files. I got so frustrated that I could not get objects to print properly (just using the print preparation software – see below) that I bought the Pro version. I now don’t think you need it. The free version will output STL files and the Print Prep software can use either an “STL” file or and “OBJ” file 5. When you are finished building your object – export it as on OBJ file or Export it as an STL file. To export as an STL file you have to add the STL functionality to your SketchUp program. Again, just Google: “Add STL to Sketchup” and you will discover how to do this Convert your File to a Print File: Next – you prepare your file to print. This is required regardless of whether you download a model from the internet of use a model you created from SketchUp. You must have software that is capable of creating a file in the format expected by your printer. The Print File provides all the info the printer requires heat the extruders, move the print bed, move the extruders, push out the plastic, and so on. The directions that come with this printer instruct the user how to download free software and install it – along with other programs and drivers and so on. I found this baffling and for $140 bought Simplify3D, which is an alternative to the free software. Simplify3D has about 9 tutorials that explain how to use it. Remember, I’m killing time until Christmas and working through these was very helpful. When you first launch Simplify3D you tell it the brand and model of your printer. Then, as you import the model you either created or downloaded, the software has preconfigured processes to facilitate printing. You can change all these but I found the defaults to work great. When you are ready to print the software shows you an extruder suspended in space above a print bed and it prints your model, on your computer screen. You can watch it and use the “repair” menu to find all the problems – before even using the actual printer. When you have the model printing correctly on your PC, you move the file to the actual printer. But this is the cool thing – if you are thinking about buying a 3D printer – get SketchUp and buy Simplify3d. Make some models; see how they print. You can learn an awful lot before making the leap to buy the printer. Now to the FlashForge It came, from Amazon, in two days. It was packed well and everything was in it. The instructions for assembly are clear – but I also found a video of how to assemble a slightly older version that was helpful. This version includes an acrylic cover and front door that help keep the temperature constant which is useful for ABS printing. The instructions that come with the printer provide a web site with a video that shows how to assemble the acrylic cover that goes on the top of the machine. Hint: Take all the protective paper off the acrylic, use some of the painters’ tape that comes with the printer to tape the acrylic pieces together, install the screws, and remove the tape. This is a lot easier than the process in the video. It took 20 minutes and a lot of patience to get the print bed level. I finally settled on this procedure – Launch the ‘Level Build Plate’ on the printer, push the extruder assembly until it is right above the leveling wing-nut closest to you. Adjust that wing-nut until paper just barely slides; move extruder until it is above the other wing nuts and do the same thing. You just push it with your hands. Keep moving the extruder and adjusting the wing nuts until paper just slides, anywhere on the bed. Printing was the easiest part. First, I printed the objects that are on the SD card that comes with the machine. These printed fine. I was a little impatient getting the first print off the print bed, which has a layer of Kapton tape. I used a sharp knife from the kitchen to pop the model loose and actually cut into the tape. So on every subsequent print there is a little flap of Kapton tape sticking up. Note, however that when you use the Printing Software (in my example Simplify3D), you can check a box for “Include Raft”. When you do this, the printer creates a lattice of plastic under your actual object. That lattice just peels right off when finished. And the lattice covers up the Kapton tape tear and minor imperfections in levelling. Then I moved to printing from my PC. I could not load the driver necessary to connect my PC directly to the printer – but just copied ready-to-print files from Simplify3D to the SDCH card that came with the printer. Then put the SDCH card in the printer and it works fine. ABS. First 10 prints were using the ABS filament that came with the printer. I had studied all the settings and variables available to control the print – but when it came time to do it I just told the Simplify3D software that I was using ABS and wanted a ‘raft’ and everything came out fine. NOTE regarding “Supports”. The reason I bought a two extruder printer was because I thought you needed a second extruder to generate ‘supports’ for parts with a big overhang, using one of those soluble plastics that can later be dissolved. It turns out that the Simplify3D software (and probably most others) can print ‘supports’ just using the same ABS spool as your model. Somehow the supports are printed so they don’t stick very much and they just break off. The only time you would really need soluble supports is if they had to be printed inside your model where you could not easily remove them. PLA. Same story (almost). I backed out the ABS filament and loaded some PLA (that actually glows in the dark!). Everything had been printing so smoothly on the Kapton tape that I just told Simplify3D I was using PLA – and printed! I did not bother to use the Painters’ Tape as instructed because that would require re-leveling the print bed. The PLA print on the Kapton tape worked fine for about 10 minutes then the entire RAFT pulled loose and got caught against the extruder and I was not watching closely and a LOT of PLA got gummed up on the end of the extruder. Cleaned it up, installed a couple strips of painters’ tape, re-leveled and it prints fine. LESSON: follow the instructions. This machine and all the software are really fun. About the equivalent to a two hour college course, I think. I highly recommend this machine and the company that backs it up. 11/5/2018 Update: I have had this machine for 4 years. I had to replace the print nozzles when they got too clogged, and I NEVER use the dual nozzle feature but this machine is a champ. 11/16/2023 Update: That machine finally wore out. I could have emailed the vendor and purchased parts but I like the printer so much I just bought a new one. And meanwhile about 4 years ago I bought another one for a different house. I’m convinced this printer is the best one available. Sketchup (mentioned above) is much better now and it works great for 3d parts. One more suggestion: Use klapton tape on the bed and clean it every time with acetone. Replace the tape when it wears (maybe every 10 prints or so) and after removing the worn out tape clean the bed with alcohol. Strength: I bought a boat in 2017 that has an 8’ x 8’ Bimini top (big heavy monster). I got 2 Linco lifters and created brackets with this printer (and ABS+ plastic, 10 layers) to print the brackets that connect the lifters to the boat and to the top. Total force on these plastic brackets is about 100 lbs! This thing has worked flawlessly (use it to get the boat under a bridge) for 7 years now. One bracket cracked so I just pushed the button on the printer and made another one.
M**S
Not a Toy — a Serious Printer for People Who Actually Want to Learn 3D Printing
I’ve been around tech for a long time and I’m pretty picky about hardware — the AD5X has earned my respect. This is not a “push one button from your phone and pray” printer. It’s a machine built for people who actually want control, consistency, and the ability to understand what’s happening under the hood. That’s a good thing. Out of the box setup was straightforward. Build quality is solid, motion is smooth, and once tuned, this thing produces consistently clean prints. Layer lines are predictable, dimensions are accurate, and it handles long jobs without drama. It feels engineered, not gimmicky. The slicer workflow is logical, settings actually do what you expect them to do, and you’re not locked into a walled garden ecosystem. That means you can learn, tweak, improve, and grow with it — instead of fighting hidden automation that you can’t see or control. This is exactly what I want in a 3D printer: Reliable hardware Transparent software behavior Tunable, repeatable results No “black box” nonsense If you want a toy you run from your phone and never think about again, this may not be for you. If you want a real tool that rewards learning and gives you control over your prints, this is an excellent machine and an outstanding value for the price. Highly recommended for hobbyists, makers, and anyone who wants to actually understand their printer instead of just hoping it works.
E**R
Looks nice, but print jobs fail
Update 7-31-16: Received replacement printer on 7/28. Nothing has been fixed. Still uses all the cheapest chinese components. The left extruder clogged on the first use. 3 trashed jobs and counting. Obviously there was some printing done, according to the meter, but was it successful? Print jobs may get part way through, then just may a big blob. The top of print jobs looks like it came from an ice cream dispenser. I've tried a different heated print bed. I've removed the left noizzle. I've tried different filaments, different temps, different speeds, lots of included test prints. I hope the 2 provided spools of filament are enough to get this thing dialed in. Update 8-3-16: It isn't looking good. The heated bed never gets more than warm to the touch, although the display shows 100C, which should be the boiling point of water. No screech, yet, but the pulleys are clearly slipping. The left extruder is jammed, AGAIN! Rrgh! I may try some different parts on it. Sometimes, the display shows gibberish in the middle of a job, and the job ends. After this, the printer must be power cycled to be usable again. Other times, the print job just stops. Twice I've had the feed stop. I say it stopped, because the filament wasn't broken, or jammed. If I went to load filament, it would load, or I could cancel the job and start another job. Prints are coming out very rough. The jobs print a few lines, then there is a gap, then a few more lines. Little pieces of filament stick up all over. Update 8-6-16: Well, I have a few successes. The white filament supplied seems to be the only one that works. The red has lots of issues, given the same job and parameters. I tried changine the temp, changing the speed. Still bad. I've used up both included spools printing the same job over and over. In the process, I've found that choosing to print another copy doesn't print the exact same thing; one could be warped badly, another could have gaps, another could get knocked off the plate, etc. I found that, although this printer has a flat build plate, the gantry is crooked. It's racked, and as it prints it raises up in one corner. The feed mechanism has lots of issues. The buttons are often unresponsive. Acceleration shows as an option, but does nothing. The annoying interior strobe lighting is unhelpful. I've been unable to get the left extruder to work for more than a few meters of filament. The auto-level for the build plate is humorous. Since this isn't possible on this printer, why is is mentioned? I don't know which is more frustrating: the 3D printers that are total junk, the 3D printers with terrible support, the 3D printers that are close, but need better support, or the 3D printers that are great, but could be awesome. If you're wondering about support for this printer, see their (lack of) response. I compared this printer side by side with my aging 3D printer. My old printer wins on successes (fewer failures that this printer's successes), quality (the jobs are almost perfect on the other printer), speed (I can print the same job at 1.00 on the other printer, vs 0.20 on the flashforge), runtime (I have thousands of hours on the other printer, vs the flashforge that dies after a few hundred hours' use), parts availability (all local on the other printer), support (the flashforge support is people who don't know and couldn't care less), and usability (the constant crashing of the flashforge is irritating, as is the interior strobe lighting). Bottom line, if you never use this printer, it's great. If you do use it, use only the white filament provided. Once you've printed a few spools, this printer is done. Update 8-11-16: No reponse whatsoever from support. The printer died. Print kept stopping, and the display would go blank. I could power cycle and feed filament, but the feed would stop when the job started. This last time, power cycling did not restore functionality. Nothing comes up on the display. When powering on, the backlighting comes on, then dims, and a few seconds later everything goes dark. Returning this piece of junk. It didn't even last for 400 hours. Original 6-20-16: First impressions are good. This is my 7th 3D printer. Although the enclosure is plastic, it is a quality enclosure, with more design and fewer screws. The sides are solid, but the acryllic for the door and hood feels good. The hood is one piece, and fits securely. The side handles are built into the enclosure. Nothing flimsy. The door handle is similarly built into the door, where it vents out waves of heat. Throughout, the design was preferred to excess screws. This means easier maintenance. The unit feels solid, and does not rack. There are metal grates over the extruder fans. The wiring coming up the back has a nice channel built into the enclosure. The guide tubes are too long for the hood, which does have a big hole that lets the heat out. The guide tubes fit into a thick plate above the extruders, and extend well below the plate. This design prevents the tubes from popping out while printing. On the spool end, space is at a premium, but the guide tubes snap firmly into place, and there is a stop to prevent unwanted winding up on the spools. Unfortunately, the spool holder design fails here, in that the spools are too far from the enclosure where the tubes pull the filament, which causes the filament to get between the spool and the enclosure. No matter how tight the belts are, they slip terribly, because the pulleys are all plastic. In addition, warping seems to be an issue. The tilted display is nice, but the location of the SD card slot is such that lose filament can get into the slot. Also, the buttons aren't very responsive. The lighting is annoying, in that it is never really the right color or brightness. Printing must be done VERY slowly to prevent the belts from slipping (40 at 50%) At the start of every print job, there is a loud screeching noise. Nothing sticks to the blue pad on the build plate. The extruders are, thankfully, both at the same height, but they don't seem to be calibrated correctly, because the left side never matches up, when changing colors. The OS seems stable, thus far, and the info available (such as build statistics) is nice, as is the fact that many of the visible options work. One option I miss is the option to control the lighting. The first print job, the bed and extruders heated simultaneously, but they've never done that since, and it takes forever, either way. It is nice that the OS can read folders on the SD card. Acceleration does not appear to work, nor ditto. The unit does not waste filament with building those waste fences, but instead drops excess filament by wiping it on your print job. The extruder nozzles leak terribly. The tools come in a flimsy ziploc bag. Basically, you get 4 allen wrenches in a bag. As far as assembly, attatch the exteuders with 2 screws, attatch the inlet duct for the filament fan, remove the plastic wrap from the front door, put the hood in place, snap in the guide tubes and spool holders, and you're ready to go. Other than unpacking, removing the plastic wrap is the longest thing. Mine came with 2 spools of ABS filament. Be aware that the filament is on proprietary spools, and that their spool holders are not designed to be compatible with other spools. I'm at 16 failed jobs, zero successes, so far. I've contacted support concerning these issues. Update 6-25-16: Nothing but failures, so far. No response from support. Lots more issues have arisen. Dual extrusion is a no-go. Both extruders extrude simultaneously--even if your jobs only uses 1 extruder. Update 6-27-16: Still no response from support. I have 1 success to show for a whole spool of filament. The biggest problem that has arisen is that the profiles are uneditable. No matter what I choose during the make process, the printer applies its own settings. This wouldn't so bad if the settings were correct. Unfortunately, the offsets and temps are wrong. There are lots of excess noises when trying to print. The annoying lighting is terrible. Update 6-29-16: Still only 1 success, but many failures. 1800 meters of filament used, so far. Support replied. I've provided pics & videos of the problems. We're starting with the belt slippage, but in the meantime, the left extruder quit working. Update 7-11-16: There are some good features; unfortunately, none of them are related to the purpose of the printer. ”Cheap junk” is the best way to describe this unit. There are many issues, which haven't been resolved. I've sent the requested videos and pictures to support. I've spent numerous hours trying to fix the issues, and wasted spools of filament with test prints. 1. The belts slip terribly 2. There is a horrible screeching noise at the start of every print job. 3. There is a sound like shaken marbles while printing 4. I'm unable to turn of the multi-colored strobe light. That purple, pink, and blue light is obnoxious 5. No manual provided, electronic or otherwise. 6. The heads are out of alignment 7. Both heads just constantly extrude 8. The spool holders are the wrong size 9. The filament slips between the spool and the back of the device 10. The filament guide tubes are too long 11. The blue bed pad doesn't sit flat, and doesn't make a good print surface 12. The profiles have the wrong temp settings, but won't let me change them 13. It won't let me edit the print settings 14. Support doesn't seem to understand English 15. Print jobs warp terribly 16. The duct for the filament fan broke off when a job got messed up 17. The print bed doesn't heat properly (display shows 100C, but the bed is only warm to the touch) 18. The instructions on the display don't match the buttons 19. The buttons barely work at all. Even after multiple attempts of press and hold, no response from the buttons. 20. 2300 meters of filament, and only 1 successful print job 21. Even the samples on the SD card failed to print properly 22. The screws that mount the extruders to the gantry, and the screws for the motors come loose every few hours 23. Parts come from China, in 7-10 days 24. The filament guide tubes break after a few hundred hours of use. 25. The pulleys are made of cheap plastic 26. After 400 hours' use, the belts wore through or broke, and the unit basically fell apart. 27. The unit started shorting out 28. Power supply problems developed 29. I have probably 2 spools' worth of 3-inch pieces of filament in the trash can from just filament load failures. 30. I have more than 100 hours into trying to make this printer print. Perhaps that's too much to ask. I considered replacing all the cheap/bad parts, until I realized that the parts would cost almost as much as the printer itself, and I had already paid for those parts as part of the printer purchase. For this much money, I expected something that worked. Print jobs that print great on a makerbot are just trash on this printer.
J**R
I can't believe how good this printer is for the cost.
This is my second 3D printer. I've upgraded from a Printrbot Simple Metal with heated bed to this one because I needed more build space for some parts I've designed as well as wanting the second extruder to be able to print dissolvable support material. At the time I purchased (Sep 2015) I was heavily considering the new Printrbot Plus, but I was very much on the fence about the purchase. The major cons to me were lack of enclosure (making ABS prints trickier) and the fact that they had just upped the price for the dual extruder model charging a whopping 400 dollar premium for the second extruder (with no way to upgrade the single extruder model after the fact). This got me looking for another option. When I stumbled across mentions of this printer it seemed like it would fit the bill perfectly and the price was unbelievably low for the features that it packed in. I did some quick research and though it seemed I would have to change what software I was using to control my printer, I felt like that was going to be a relatively minor inconvenience. Without hesitation I placed the order and within two days it was sitting at my door. Initial impression The printer construction is much more solid than I had expected. I knew that it was a metal frame, but I expected the plastic parts to be much lower quality than they are. When I first fired it up it played a tune (something common of many chinese appliances). I found this overly loud and irritating, but it is easily disabled in the settings. Initial print quality was quite good, better than my Printrbot. After having used it a bit I now realize that this is due to the difference in slicer being used. If I use the same slicer as my Printrbot used, the quality degrades to what I was used to seeing on there. Oops, I guess I should have done a bit more research when I still owned the Printrbot. The ReplicatorG software works well with some minor inconveniences: - When printing a skirt it only does one loop and I can't space it as far away from the actual print as I would like - When it generates gcode it always wants to set the bed temp to 110C which is probably fine if you are doing ABS, but for PLA it's WAY too hot. I haven't found a way to change what it generates, so I always end up editing that line in the gcode after generation. - If the ReplicatorG window is covered up while printing, it will eventually stop moving the print head leaving a big blob in your print. I solve this by having a second monitor and just moving the Replicator window there to allow me to continue working while it prints. - Slicing takes quite a bit longer than I'm used to, but does seem to produce a better quality finish than I'm used to getting as well. It takes something along the lines of 3 or 4 times longer. This is because ReplicatorG uses Skeinforge where I was using Cura or MatterSlice. You can also use MakerBot Desktop software, but although it works I can't say it works well. No option to print a skirt, no jog controls makes it a no go for me. It did let me adjust the bed temp properly though. :) Customer Service When the printer arrived all parts were well packed and padded and everything seemed in order. When assembling it though I noticed that the front door had a large scratch in it. I know I didn't put it there because the plastic was still in tact when I was assembling and removing it revealed the scratch underneath. I was a bit bummed, but figured I would reach out to Tang and see if he could send me a replacement. After explaining the problem he said he would send a replacement right away. It just arrived yesterday (even MORE well packed and padded) and is flawless. I installed it last night and I'm thrilled with the aesthetic of the printer now. I am quite surprised with the quality of customer service received from Tang as I know that usually Chinese electronics get something of a bad rap in the US. If I hadn't known it was coming from China I would have assumed I was dealing with a top notch US electronics company. Kudos on that! Print Quality Now that I have gotten the bed leveling procedure dialed in (I didn't have to do this with my Printrbot) I am getting great quality prints. The extruder is a little messier than the Printrbot's when getting started, often leaving a pretty big blob as it starts to print a skirt, but it seems flawless during the print itself. The Printrbot was somewhere in the middle on both those things, smaller initial blob, but it could "leak" during moves even if significant retraction was used. I believe this is due to the difference in extruders between the two printers. The heated part on the Printrbot was much larger, so more of the filament was molten during printing. This meant that even with retraction it was hard to stop molten filament from leaking out of the bottom. The FlashForge has a much smaller heated part, less molten plastic at any given time leading to less leakage. My only complaint with the new extruder is the fact that internally the hot end seems to have a larger diameter than the extruder opening. This means that you have to be careful how you change filaments to avoid causing a jam. Since this process seemed pretty intuitive to me and I've had no problems with jams. Ease of Use This printer is definitely harder to use than my Printrbot was. If this is your first printer, expect a steep learning curve because nothing about the software is going to hold your hand like it does on the Printrbot using MatterControl or Cura. However, once I got it dialed in, it is only slightly more complicated than my previous print process. Cons Every printer has some downsides and this is no exception. There are a few things that I will be changing on this printer. - I don't like the way the filament spools work. I have already printed a new spool holder to fit the existing screw pattern on the top of the printer so that I can hang them from above. This will likely get in my way for enclosed ABS prints, but I'll tackle that when I come to it. - The fan on the bottom that cools the motor drivers is CRAZY loud. I'm in a small apartment and it's just about too much to have running for a 5 hour print. I expect to be changing the way those driver chips are cooled in the future in order to eliminate that fan - There is no active cooling on the print head. This really is necessary for good quality PLA prints, especially if you're bridging or trying to print pieces that push the "no support" limit. I'll be printing a fan duct to solve this, but the clearance on all sides of the print head are going to make this a little tricky to get right. I don't feel like any of these things is a deal breaker or even unsolvable, so I'm pretty happy. Overall Value This printer seems like a fantastic value for the money. I still can't believe it has all these features at this price point. Customer service is really good and Tang really seems to care about how his company is perceived. I appreciate that. All in all this printer gets my endorsement as a great bang for the buck with quality far exceeding my expectations.
R**E
Seems like a good choice for our first 3D printer
This is the first 3D printer our family has purchased. Since it had a decent build volume, great reviews, and was considerably less expensive than most of the other printers I'd investigated, I was able to convince the Mrs. to OK the purchase. We ordered the printer last Thursday with Saturday delivery. Unfortunately, UPS wasn't able to deliver it until Monday; so, I didn't get to try it out over the weekend. It arrived early Monday morning, though; so, I unboxed it before I went to work. I was a little concerned because it looked like one of the motors had broken off and was floating loose in the printer, but I had to get to work. I asked the Mrs. to make sure that the kids stayed out of the basement until I was able to assemble everything. After work and an evening meeting, I was able to head back down into the basement and start work. The assembly instructions were emailed separately as a PDF and were pretty straightforward until the acrylic top shield. The manual refers the user to a video that illustrates the assembly of the front door and top shield. Though the video was in Chinese, it was pretty easy to follow. The way that the top shield goes together (with machine screws and nuts) is pretty elegant although the nuts are small and easily dropped. Even so, the hardest part was pulling the paper off the acrylic. Not bad. The next step was to tighten several screws, and it was during this inspection step that I confirmed that one of the motors had indeed broken off. Fortunately, they had included a new bracket; so, it was a pretty quick fix to remove the old bracket from the motor and the parts from the printer then replace it with the new bracket and reconnect the belt. I tightened the remaining screws and followed the directions to set up ReplicatorG on the computer nearby. After getting the computer set up, I started playing with the software and got antsy to try to print something. I ran into a couple of snags and a warning message that basically recommended against printing over USB. From what I've read, that seemed like a common recommendation (avoiding buffering issues, hardware problems, etc.); so, I decided to try one of the existing test builds on the SD card. I did have a little trouble getting the card into the slot (the alignment isn't that great), and I heard a snap followed by the card offering no more resistance. So, I pulled off the front panel and started trying to figure out what went wrong with the memory card reader, and I found a piece of white plastic and a small spring--the two parts that normally allow the memory card to be inserted then "stick" at the detente. I wasn't able to get the card reader back together the way it should have been, but I figured I've had readers without the detente that work. While I hadn't planned on digging that far into the printer, I am kind of glad I did. The interface board, LCD panel, and input module are pretty simple and seem to be pretty solid (aside from the memory reader and it's slot alignment). So, I re-assembled the front panel, inserted the card, and powered it up. The printer went to home state; so, I could tell that all of the motors were working. I tried accessing the memory card again, and it worked. I chose to print the left test pattern (sort of like a small vase with a wide flat square base and a cylindrical tube), and it started running. It was pretty exciting to see everything working. I watched the print for a while, and the print was looking pretty good for a bit, but after about half an inch, the walls of the cylinder started looking a bit ratty and didn't hold together very well. I let the print finish, and pulled off the loose part. The bottom looked pretty good, but I was a little disappointed by the top. I read a little further in the manual, and finally came to the part where it mentions leveling the build plate because it may have shifted in transport. So, I used the utility on the front to level the build plate--the utility just moves the head and build plate so that the head is centered just above the build plate. I adjusted the wing nuts until it looked like the two extruders were just touching the build plate. I then exited the utility and set up to print the right test pattern. Because it was pretty late, I watched it for a little bit then went to bed. When I got up this morning, the print was done, and it looked much better than the first attempt. The boys were all pretty excited to see the test print when they got up, and even the Mrs. was a little impressed. It's possible that the poor build could be from the extruder, but I'm going to chalk it up to the build plate leveling for now. So, that has been my experience over the first day of having the printer. My general impression is that the hardware seems to be generally pretty solid, but some tinkering may be required. I enjoy a little tinkering, and it prodded me to look a little deeper at how the machine was put together, and I liked what I saw. The assembly was relatively smooth, and, fortunately, FlashForge sends spare parts with the printer. My first build attempt wasn't quite as good as I hoped, but once I had the build plate properly leveled, the next print came out pretty good. I think it will be able to do the projects we had in mind for it and a lot more. Because of the kinks (the broken motor bracket and the memory card), I can't give it five stars, but I am glad that we made the purchase. Solid 4 stars.
N**B
First foray into 3d printing
After spending untold thousands on developing prototypes, my wife coming close to divorcing me, and a lineup of ideas and projects, I was looking for a more cost effective way to bring my ideas to life. I did a significant amount of research on 3d printing, but not an exhaustive search, as my main goal was finding something I could afford, but that had the ability to actually bring my crazy ideas to life. As I type this, one of those ideas is being built. I've posted some quick photos and a video to show the progress. So far it has been printing for about 3 hours and is coming along quite nicely. There is one minor issue that is a result of a learning curve in terms of settings, as I've learned that addressing things like plastic curling from the bed, stringy prints, etc., have more to do with material and environment, than anything related to the machine itself. I have to say that it took me a few tries to get to the point of printing the concept in the photos and video, and there are still some more settings I need to work out, but the product has been superb thus far. But let me start with my general experience with FlashForge, Tang and his team. First of all, I originally order the first version of this Creator. http://www.amazon.com/FlashForge-Printer-Extruder-Compatible-Volume/dp/B008CM2TCU/ref=sr_1_1?ie=UTF8&qid=1394165975&sr=8-1&keywords=flashforge Luckily, I ordered it late on a Friday night, and the very next day FlashForge released the Creator X. I canceled my original order with Amazon, thought about it for a day, then ordered the Creator X as a "Pre-Order" item, because the printer was just posted and was stated to be shipping in March, this was February 11th, 2014. I was ok with the dates, because I was still designing some of my ideas and knew it would take a few weeks to get things right. Well, on February 13th, I got a notification that the Creator X had shipped. I was shocked (and worried my wife would find out before I had the chance to explain what I had purchased...a whole other story.) The printer arrived by Thursday of that week. It came directly from China, had all the "Paperwork" attached and it was quite impressive. It took me a couple of days to explain to my wife what I had done and get clearance to unpack it in my basement. (Just an aside, guys that are married, make sure the first thing you print is for her.) I finally got it unboxed and started to put it together. At this point, I started to get worried, because I ran into a few issues that seemed perplexing. Before I get into these, I have to say, the other product reviews talked in detail about Tang, his responsiveness, how helpful he is, etc. and I 100% concur with that feedback. Though there were issues, a couple of them immediate show stoppers, Tang responded almost immediately, mostly within 20 minutes, but no more than a couple of hours (time difference being an obvious factor.) The five star rating has more to do with Tang's customer service, and less to do with the quality of the device, not because it is low quality, but because it is my first 3d printer and I have nothing to compare it with. But, I will post some additional pictures once I have some of my ideas printed out. Regarding the packaging, it was very well packed, no damage, and the unpacking instructions were spot on. Once I got it unpacked, I started to run into some issues. So here are the problems I initially ran into: 1. As I was following the instructions, there were some inconsistencies with the parts and the explanation of the parts. For example, in one section, it states to use the two shortest silver screws, well, there were only two silver screws and they were different lengths. In addition, when I went to use the included Allen Wrenches, the size I needed for these silver screws was not included. It appeared there were two of the same size accidentally included. I brought this two Tang's attention and he assured me that he would address it with his quality control team (I 100% guarantee he did.) This wasn't a huge deal as I have plenty of Allen wrench tools. The size of the screws was not significantly different and they worked for attaching the print head to the trays, so no big deal. 2. The second, more significant issue I ran into was when I turned the machine on and it started to go through its startup routine and seemed to want to go through the top of the machine. I immediately turned the machine off, then back on, same thing. Not being familiar with 3d printers, I emailed Tang with some photos of everything I could think of and within 20 minutes he emailed me back with a video of what was most likely happening and how to resolve the issue. And he was exactly right, easy fix, no damage to the device. The issue, as I came to realize, was due to the unpacking process. When I was unpacking the Creator and the various boxes, I accidentally, though understandably (due to the way it is packed) pulled a sensor out of place, and pushing it back in place resolved the problem. Ok, on to printing. 3. I printed some samples out and they came out surprisingly well. I initially used the left extruder and it worked great. I tried to use the right extruder and it was not extruding at all. I pushed, pulled, jimmy'd the filament...no go. I switched plastic types, changed temps, zero. Finally sent Tang an email and again, almost immediate response with a video on what to look for and how to fix it. Problem was some left over filament in the filament gear feed (not sure the correct term). The video was detailed, took a few things apart, cleaned out the blockage, put things back together and it worked fantastically. The rest of the things I've been wrestling with are software and settings related. You do any search for 3d printer troubleshooting and you will very quickly learn that tinkering is the name of the game with this toy. And it is exactly spot on. I've come across a great thread from a guy who has spent many hours of his time and provided valuable insight to save you many hours of your time. Definitely worth a read if you are deciding to get a Flashforge. Though it is for the older model, it was 100% relevant to the Creator X: [...] Ok, so I am still learning, experimenting, testing, etc and it has been a blast to learn about the machine, understand how it works, take it apart, and put it back together. It is honestly the best way to become familiar and really understand how the world of 3d printing currently works. So the machine is great, once you get any initial troubleshooting things out of the way and begin how to use it. But I really want to emphasize the company on this one. And this is where I get a bit philosophical. If Tang's dedication to his product, his company, his pride in what he has brought to the market place was absent when I received this product, at the first sign of trouble I would have packed it back up and told him to send me a return label. But there was a valuable lesson I learned, that I think more American's could take note of. That is, a realization that when you work hard, are honest (oh this reminds me of something else with my experience), stand by your product, don't expect people to just accept what you put out, and have no sense of entitlement to someone's business, you develop a true sense of what it takes to make people satisfied with your product or service. Tang has this down to a T, a big FAT T. I am inspired by his entrepreneurial spirit, it just makes me want to design and print, and work, and tweak, and develop and never give up on my own dreams. So thank you Tang, not for the product you've given this market place, but for the example you've shown me, and clearly, countless others based on reviews. I will continue to post my experience as print more and more with the Creator X. Thank you again. Oh, and I mentioned earlier about honesty...this blew my mind. So when the Creator X was first posted, the cost was 1399.00. I purchased it at that price. The day the product shipped, February 13th, I guess Tang decided to lower the price to 1299. I got an email stating that I was getting a refund of 100. I wasn't expecting it, I had already mutually agreed to the 1399 price, and it was such a pleasant surprise to experience this type of honesty. Hard to come by these days. Thanks again Tang, I wish you great success in your business and look forward to continuing to work with you.
C**E
Great Printer, Good Price, Less Than Perfect Instructions
I've now been running my FlashForge night and day for a week trying to get a very large project done in time for an event, and I have to say that aside from a few hiccups during setup, this printer has been absolutely flawless for me. I wish I could give it 4.5 stars, because it wasn't perfect (2 days of headaches getting it up and running), but the experience after everything was running has just been so good that I can't justify knocking it down to 4 stars. Now, the issues I had getting everything up and running to help you avoid them: 1) Oddly paced assembly instructions. While they don't send you a book, they do send you a PDF with instructions that are at the same time amazingly detailed, and astonishingly lacking. The first part of the instructions are several pages of just how to take the printer out of the box. Now granted they pack this thing up really tight, and you will need to know things like how to manually raise the print bed to get to the stuff they backed in underneath it, but generally speaking I think everyone knows how to unpack a shipping box. On the flip side, you have to assemble the door and the acryllic cowl yourself. There are no print instructions on how to do this at all, just a link to a video of someone demonstrating it while speaking Chinese. Not that you really need to understand what he is saying to get the gist of it, but the video isn't exactly in HD and it can be difficult to see what screws he's using as he just whips it out. 2) Random assortment of screws and parts. It ships with multiple baggies of all sorts of screws, nuts, wingnuts, fuses, and even this odd black ring fixture that have absolutely nothing to do with the printer you just bought. The screws are all sorts of different sizes. Kind of like buying something from Ikea, only they forgot to include the assembly instructions. In the end, there simply were not enough of the correct sized screws provided for me to finish assembly. That caused a couple hours overall of confusion while I tried every possible combination of the screws provided trying to find the exact right match for each section. After I came to the conclusion that the screws I needed just weren't there, a quick trip to Radio Shack for some machine screws and the rest of it went together quickly and easily. 3) It is very picky about it's printer cables! It ships with a USB A to B (aka standard printer) cable, but I just grabbed one out of my drawer to use. After a couple hours of struggling with the printer not showing up in device manager, not showing up on my port list, scouring the internet for clues, I finally said "Fine, just to make sure I have covered every possible base, I'll use the cable they sent." Then it started working like a charm. The old cable had worked just fine on my 2D ink printer, but it absolutely refused to work on my 3D printer. Only guess I can make is that there must be some kind of USB A to B 1.0 and 2.0 cable, and I had an old 1.0 while the printer absolutely requires a 2.0, but thats just a guess. Save yourself some time, and just go straight with the cable they send you. Things You Will Need to Buy Separately: If you are going to be printing in ABS, you are going to need to buy some acetone (nail polish remover). As you print, oil from your fingers, dust from your prints, etc will build up on the bed, even if you wipe it down every time with a cloth. That will make your prints start unsticking from bed and giving you failures. A quick dab of acetone on the cloth as you wipe the bed down for your next print will make everything stick like a charm. Tips and Tricks: 1) Small ABS prints may have warping in the base where when finished it looks like it has pinched together in a taper. This is caused by the plastic shrinking a little as it cools and the next layer being put down before the bottom has fully cooled. The best way to combat this is to lower the temperature of your print bed a bit (say down to 105 C from 110 C). This will likely cause the print to not hold very well to the bed, so use: 2) ABS Slurry. Its like glue for your print bed. Take some of your acetone and drop a small piece of extra ABS into it. The ABS will dissolve in the acetone. Just add a little bit until the acetone gets a little cloudy looking. Put some of this mixture on your print bed just where the print is coming loose (don't cover the entire bed with it, just put it in trouble spots). This glues your print down, but be aware that it can GLUE YOUR PRINT DOWN, seriously. Don't overdo it unless you want your latest print to become a permanent fixture of your printer. ;) 3) Heat your bed, even for PLA. Heated beds are required for ABS, but technically they aren't required for PLA due to them working at lower temperatures (make sure you open the front door and take off the cowl when working with PLA!). However, you can get some better print results if your PLA isn't sticking properly by slightly heating your bed to 40-50 C. Just don't go with the same 110 C you use for ABS unless you just want to see your PLA print melt into a puddle! Anyway, absolutely wonderful printer for the money. Solid week of day and night nonstop printing and it hasn't batted an eye.
C**2
Good and getting better
Background: I'm a professional industrial designer and have a lot of experience with different types of large-scale 3D printers. I was looking for a something I could use in my home and private practice for a mixture of personal and client work, and after establishing my budget and doing a lot of research I settled on this guy. SETUP: Setup took me a couple of hours, but that's only because I was being very deliberate about everything and read the manual cover to cover before I started putting things together. Having done it now, I'm pretty sure I could do it again in under an hour if I wanted to. Especially since a large portion of my setup time was devoted to unwrapping and assembling the plexiglass covers and door, which are supposed to be removed when printing PLA anyways to allow for better circulation (I've opted to do most of my work in PLA instead of ABS, more on that below). Looking back on it, the setup is not actually that complicated. Mostly you have to unpack a couple of the more delicate things and screw them in place. DOCUMENTATION: Manual is passably good. The english gets a little rough in some parts, and I question the order in which a couple of sections are presented, but I managed to get the whole thing up and running and the software installed without using any outside resource, so it clearly does the job. Overall if you're unfamiliar with the machine I suggest giving it a skim-through before you start and that should prevent any surprises. SOFTWARE: There are a number of "slicer" software packages out there in the 3D printing world, and a number of them will apparently work with this machine. A copy of ReplicatorG is included here (on an included SD card, which is used for printing). RepG is good but not great. I've used it exclusively so far, but when I attempted to slice a very complex model yesterday (a very dense mesh of a human figure), I discovered that it has an absolute limit in terms of memory capacity. I'm now looking at a couple other packages that will supposedly work better. Options range from open source (CUDA, --I had some issues setting it up and ultimately moved on, but I've seen people who apparently use it) to paid professional software like Slic3r or Simplify 3D. I'm currently testing Simplify; besides the memory issue, it looks like it may streamline my workflow a bit, which would be very nice for me when it comes to professional work. Having said that, if you're primarily a hobbyist or your parts are simple-to-intermediate in complexity, ReplicatorG would conceivably work just fine. USE: I've been creating/downloading a bunch of different types of parts and trying out a couple different materials since I got it. There is absolutely a learning curve when it comes to the temperature and hotbed settings for each model and each material (even if you're using all PLA, different colors have different quirks). I had some severe warping issues when I first tried the included ABS materials. I managed to greatly reduce this by experimenting with the temperature settings, but for most stuff now I'm just going with PLA as I said, as it's much less prone to warping. Unless you have a very specific reason why you NEED ABS, I don't see why you wouldn't. Was initially concerned about having to level the bed, seemed like a huge pain. Turns out it's pretty easy, just takes a little practice. Some of the experienced guys on the internet make it sound like they have to level before every job (maybe they do), but honestly I've been doing it every couple of jobs IF something seems off and it's been running fine. Also, when I was shopping, I worried that the build envelope would be too small at this price range. While, yes, bigger would always be better, honestly this one is big enough for most of the things I would ever do. Anything much larger would probably be better to print as separate pieces anyways. Common observed print failure modes (things that can go wrong): -Parts don't stick: This happens when the printing bed is not level, or your temperature settings are off. The printer will try to lay down the first layer, but since it won't stick to the bed, you just get a string of "spaghetti" that gets dragged around and keeps getting worse. However it's not that big a deal. I let it run (accidentally) for an hour or two like this once, and it made a big old stringy pile, but I canceled the job and just pulled all the waste out no problem. The material isn't sticky or anything, you just snap it off and pull it out. Minimal mess. -Goopy start: can be a temperature issue, or maybe related to a partial "didn't stick to bed" issue as described above. A rogue element of goop clings to the nozzle and interferes with the rest of the job. -Parts are "stringy" or "hairy:" exactly what it sounds like, your part finishes but has little spiderwebs of thing plastic strands on it, like a hot glue gun would leave. Again this is a temperature issue--you're slightly off of the ideal setting. Having said that, it's been very minor on the one or two jobs that had this issue for me, and i just pulled the hairs off. -Part de-laminates midway through: usually happens when a support structure (auto-generated by your slicer software) snaps, doesn't stick to the bed, or just doesn't do its job right, resulting in a layer not being laid down where it needs to be, and then you get a spaghetti mess midway through your file. Rare but annoying. -Part breaks midway through: basically the same as above, except the part itself fails due to a too-thin cross section. I printed a tiny little human figure and one of the legs snapped at the ankle. This was compounded by the fact that the bed was very slightly off of level, so the nozzle was dragging just a little bit on that leg and not the other. Corrected by leveling bed and scaling up the part a little bit. Could also have added support structure. Solutions for most of these: -Level the bed -Adjust the temperature of the extruded and/or hotplate (remember that Celsius jumps faster than Fahrenheit...whoops) -Add stickiness. I put a little hairspray on the bed and it seems to help, though I try to contain it so it doesn't go shooting all over the other components (which concerns me). Some people seem to like klapon tape or blue tape or glass beds; do some research. So far I'm still using Flashforge's stock blue bed sticker, that seems to be fine. Most of these will occur in the first few minutes/layers of a print, if they're going to happen. I usually stick around and watch it when it starts to make sure it gets going OK, then I'm comfortable walking away while it runs. For some jobs I find that simply canceling and restarting (for example if it lays down a goopy opening layer) is enough to fix it. You can also adjust the nozzle temperature on the fly, but the bed must be adjusted via computer. Also, apparently, don't use the USB cable. The computer may not stream the data fast enough, and it makes the circuit vulnerable to EMF interference (static), which can screw up the print. RESULTS: High success rate for small to medium size/complexity parts. Support structures generated by RepG are a mixed bag; sometimes easy to remove, sometimes not. I have higher hopes for Simplify 3D's supports. Having some issue with larger parts (longer runtimes). See below. PROBLEMS: One major problem so far. When running larger parts - particularly anything that takes more than a couple hours - there seems to be a chance that the printer will "hang." By that I mean that it just stops at a random point during the job. Extruder is still on, but stops feeding. Menu can be accessed and even functions, but nothing will make the printer resume the job. It has to be canceled. I'm not sure if this is a software glitch or a hardware issue. A solution is in the works, see customer service below. I also had some intermittent issues with bad toolpaths, but I believe that was a software problem. CUSTOMER SERVICE: Flashforge is based in (I think) China, but they are very eager to provide technical support. I received an email several days before the printer arrived with contact information for Mr. Tang, who is the (or one of) customer support rep. for Amazon sales. After trying unsuccessfully to fix the "hangup" problem myself, I contacted him last night and received a quick response (given the time difference). He first suggested I check on a software setting in RepG, which was indeed set incorrectly. However upon further analysis he suspects something is wrong with my SD card, or the SD port. He opted to ship me a new SD card reader, which is now on the way. Overall he's been very helpful, so I would say that service is a positive mark for Flashforge. I was initially concerned that it would be hard to get tech support from around the world, but I'm not worried about that anymore. Hopefully the new part solves the intermittent hangup problem, but if it doesn't I believe they will continue to try until it is fixed. VERDICT: Overall, pleased so far. Would like to get the hangup problem resolved, but Flashforge is working on that as fast as I could possibly ask, so I can't hold it against them. Also looking forward to trying the new software in the meantime; perhaps that will resolve it too.
Trustpilot
3 weeks ago
1 week ago