Desertcart purchases this item on your behalf and handles shipping, customs, and support to South Korea.
🛋️ Transform your space with flexible style and effortless installation!
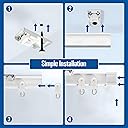
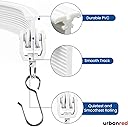
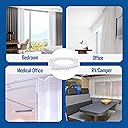
The UrbanRed Flexible Ceiling Curtain Track is a 5-meter long, white, durable PVC rail system designed to bend up to 180° for versatile room layouts. It includes 40 rollers, 40 iron hooks, 15 snap-on ceiling brackets, and end caps, enabling easy, tool-free installation. UV-resistant and strong enough to hold up to 33 pounds, this kit is perfect for creating custom curtain solutions in any home or office environment.


| Brand | UrbanRed |
| Color | White |
| Item Dimensions L x W | 196"L x 1"W |
| Item Weight | 2.3 pounds |
| Material Type | 40 track rollers and universal sturdy 40 iron hooks compatible with any curtain or tapestry, Premium UV-resistant vinyl flexible to 180° or any shape, End covers and brackets for a pro-look installation |
| Maximum Weight Recommendation | 33 pounds |
| Mounting Type | Screw-in Ceiling Mount |
| Product Dimensions | 196"L x 1"W |
H**Y
Very easy to install, but you need at least two people, a drill, a screw driver.
My ceiling was 30 degree sloped, but this rail worked both horizontally as well as vertically. On the vertical side, gravity will pull the curtain down. The rail was shipped coiled and it took a while to straighten it, but it doesn’t need to be very straight. A 45 degree coil would also just work. The anchor will be pretty strong once you install them, so the rail will stay in shape as how your anchors are aligned. The rail is very flexible and durable pvc. There are 16 anchors in the 16ft version, it’s more than enough. The hardware looked high quality. We hung a photography background as a curtain, so we don’t know how much weight the rail can take. However regular curtail should have no problem. The end pieces are smaller than the rail, so you need to expand them a bit to put them on. Remember to put the rail on the non movable side of the anchor, then push it in. Otherwise, it won’t go in. You can clip the roller into the rail after you have installed everything. You can also slide them in before you out the end pieces on. If you need to cut the rail, you will need a pretty strong scissors. We used the garden scissors. Overall, very happy about the product.
J**H
Easy, sturdy, and worthwhile DIY for hanging drapes
This was surprisingly easy to install. I did it with help from my 6 year old daughter. Seriously, she was great at running the rollers and handing me parts. Popping the line in there after placing all the holders wasn't hard at all. I would guess measuring and lining thing up just so - in other words, just following instructions - is the "trick" to keeping this as easy as advertised. It does take a day to straighten it out after delivery, but I did take a hair dryer to it to help it bend around a corner and that worked pretty easily, so you can probably speed things up that way or with a hot water soak, like the instructions suggest. It is holding a pretty heavy drape with no issue, the rollers feel sturdy when I move the drapes, and the price for this was really low vs. other options. I was considering hiring a pro, which is crazy expensive compared to this. Would have paid 3x what I did for this plus (not cheap!) drapes. Honestly surprised at how well this worked out. Well worth it. EDIT: Just have to add that after a year and a lot of use there is no sign of wear at all. Still happy I bought this!
L**T
very decent product - see installation notes
I found the Urbanred product to be pretty decent quality for a good price for its intended use in my Tiny Tiger-70s-lite Lady Lounge. I have some mid century windows that I had installed some shelving and cat (tiny tiger) steps beneath, so I didn't want long shelves directly flush with the windows. Instead, I used the track to create a soft, sheer separation between the shelving, steps and window light and the rest of the lounge. Since the track is plastic, and slightly flexible, I was able to create a soft wave pattern by measuring the space between each peak and valley of the wave on the ceiling, mark it, and install a clip at each one so that the wave came out somewhat evenly. The wave added fun visual interest and mimics the waves in some other areas of the 70s influenced lounge. You can see some of the stages of installation and final product where I hung just 2 of the sheers on either end of the final track, just to create a division. I'll be adding more sheers to the entire track, soon, but the pictures give you an idea of the result. Since the windows face the forest, I didn't need privacy curtains for my use, but i think the hooks and track rollers are strong enough to hold something heavier than the light sheers I hung. Installation notes: I WAS able to do this myself, and I'm only 5'3. The ceiling I worked on has a slight slope, so it was definitely a somewhat difficult project, overall, because the track has to be put up all at once, and manuevering by yourself isn't super easy. Things that make it more manageable: 1. Put it under some heavy stuff for a few days to try to straighten it as much as possible but not flatten or scar the grooves on it. It's ok if it doesn't come out completely straight afterwards, but you do want it to be mostly straight, and not coiled up when you install it. I would recommend putting it under some moderately heavy furniture that no one is sitting on for at least 3 days. If it's coiled up when you go to put it up, I don't think the clips alone will be able to straighten it out. You need to train it before the installation. Some people use warm water to do that - I used some medium weight furniture and stretched it across the floor, repositioning the furniture legs on different curved areas every day. 2. I definitely recommend using the quality clear plastic butterfly toggle anchors! That made a huge a difference in installation and security of the track in the ceiling! 3. Get good screws - I wouldn't use the ones it came with, I'd use good screws meant for the butterfly toggles anchors. I used a combination of small and medium ones; small toggles definitely fit and work, but I used medium toggles every 4th hole because they are heavier-duty, meatier, and can sustain a heavier load, just to give the overall track strength. I used only the heavy duty ones at the ends and center, as well, which might have been overkill, but I wanted more assurance that the clips will hold and not yank out of the ceiling. 4. Definitely mark all of your holes where you need clips installed in the ceiling ahead of time for drilling, then pre-drill holes to correctly fit each butterfly toggle anchor so that it's not loose in the ceiling. Use a rubber mallet to gently put your butterfly anchors into the holes. Once you have your anchors in, the process goes more smoothly. I don't know if the anchors it comes with would be reliable since there's nothing hardcore to prevent them from popping out of a ceiling application when weight is put on the track. I didn't even risk it. Next install your clips by using the screws that fit the butterfly anchors to secure the clips into the anchors. It's tedious, but not too bad. 4. It is possible to cut the track to the size you need, it's just a pain. The end caps will cover the cut if your saw job isn't perfect. You can put the end caps on now or after the track is installed 5. If your clips are secure in your anchors, it's a matter of slipping the track into each. This is the hardest part though. It would definitely be so much easier to get the entire track into the clips with another person, or even 3 people! 6. Getting the track into the clips isn't an easy task, but it's possible even if you're doing it alone like I did! If you're by yourself, the key is having something to rest the track on that's up high near the ceiling, like a tall ladder or something on the other end, while you get your other end into the clips. Once you get one end into the clips, you can go put the other far end into the clips on that side, so that the track is not hanging anymore. (It's very hard to manage and get into the clips when the track is hanging down on one side) It's possible to kind of move and adjust it into just the right place once you get both far ends up though! I had to stand on the ladder and take it out of the clips and readjust it several times since I did a wave formation with it, but I think if it's installed in a straight line, it's much much easier to install. You do want it tight and not loose, and when you take it out of the clips, sometimes the plastic track gets scarred. It's definitely a P.I.T.A. project which took me multiple days to complete, but once it was done, it functioned great for me, and I haven't had a problem with the wheels on the roller pieces. I think it suits the application I needed it for perfectly, and it doesn't look unsightly at the ceiling level in my setting. Goodluck!
J**E
Easy installation, work great with good quality.
We're really happy with these flexible rails. We had a semi-circle bay window and a 3-sided bay window, so couldn't do this any other way unless we ordered custom. Clips were easy install with drywall anchors. The rails are flexible but firm and i-beam shaped so there is no sagging in the rails after install. The rollers roll smoothly, even around the bends, and the end clips are solid. We don't have a recess for curtain rod, but still the rails look just fine whether our sheer curtains are open or closed. The round install used the full 5 meters length, and I cut about 2 ft. off of the 3-sided install. I used all of the clips provided for these installs, but still had to order an accessory kit because I needed 6 more rollers.
T**R
Great Product, Have Patience
Flattening the track took time. I left it strung out across my apartment with heavy items on each end for a couple of days, then read the instructions, which said to use a hair dryer to heat it and gently work it straight. I did that for a couple of feet and got impatient tbh (my length of track is about 11 feet long), so I carefully forced it in the opposite direction from its existing bend without heat and it straightened out enough for me to be happy with it. It still had a curve to it, but I installed the ceiling mount brackets 10.5 inches apart so they hold it straight enough for me to be happy. The curtains hid the imperfections in my case anyway. The people complaining about the end caps not fitting are wrong. I agree with the photos they posted in their reviews. The track does have little outward protrusions on the top and bottom, whereas the caps only have space for that protrusion on the "top". You can still put the end caps on. No rubber band fix needed. It took some patience to get them started (at which point I was worried those reviews were right), but once the cap got started, it slid on tightly (which is the whole point). Learn from my mistake when measuring the spacing of the ceiling mount brackets: the end caps take up space on the track. Make sure the brackets on the ends are about 1.5 inches inside of where you expect the track to end. The track is lightweight and seems to hold the weight of the curtains well with the ceiling bracket spacing I chose. My curtain panels are 9 feet tall by 100" wide, and I have 2 panels, so they have some weight to them (still well under the 33 lbs limit of the track though). I purchased the black track. It's shiny black plastic. Nothing unexpected there. I feel like white plastic sometimes looks cheap, which is why I went black even though my walls are white. It blends in fine with my dark colored curtains. A gotcha I ran into is my curtain panels had a rod pocket and back tab loops, neither of which are compatible with this track. I purchased something called curtain pin hooks (after consulting ChatGPT) and although it took time to measure them on the curtain so they were evenly spaced, they were exactly what I needed. In fact, the pin hooks raised the curtains a bit higher which hid the track a little bit. Super happy with that. This review is written the evening I finished hanging everything up. I have no idea how these will hold up long term. At this point, I highly recommend them though. I used this product to make a curtain wall in my bedroom in front of my window, and will attach a before and after pic of it. My window trim sticks an inch out, and I mounted the ceiling brackets about 4 inches from the wall so the curtains have space to bunch up. Don't look too closely at the ends in my after picture or you'll see I haven't yet fixed the end mounting brackets lol It looks fancy and I spent just under $115 in total with this track and the 2 curtain panels. Couldn't be happier with the outcome!
L**I
Easy to install, easy to use, and looks nicer!
It is nice to have a different option to put up the curtains. It is much easier to open and close than the rod curtains.
G**P
Good enough but end caps don't fit
Overall the rail works well enough, the mounting brackets are sturdy and hold the rail very securely (it's going to be difficult to remove if I ever have to), and the rollers move pretty smoothly. Unfortunately the rollers do bump up against each other and lock up, so you have to pull from the direction you want the curtain to go instead of drag from the edge that's moving forward, but that's easy enough to get into the habit of. The track is very flexible and should be able to fit any configuration I would reasonable want. The included instructions are very bare-bones and leave a few open questions about how it should be installed (e.g. is there a recommended spacing between mounting brackets) but if you're buying this you can definitely figure it out. My main complaint with these is that the end caps *do not fit* on the track. I've tried firmly pressing them, heating them up with a hairdryer, tapping them with a mallet, and other attempts at forcing them on, and they just flat out don't fit. I contacted the company via their information included with the instructions, and they replied very quickly and offered to send an accessory pack which would include the correct end caps. When I received that, it had end caps which were the exact same as the current ones, which *do not fit* the track. A bit more back and forth with them and they recommended some things to try to get them to fit, but I've already tried their suggestions, and these caps just *do not fit*. So I wrapped a rubber band around the ends of the rail to keep the rollers from falling off like another reviewer with the same problem, and it's good enough (although looks a bit janky). That's a lot of complaining about one small problem, but I'm tired of buying products that mostly work with a few small flaws, it's exhausting and I wish companies would ensure quality through the entire product instead of just most of it.
S**S
Look great, very easy slide (some installation hints included)
Used a double track system to create a Zoom background. Love the results. I won't say it was easy to install, but it certainly wasn't difficult. It's just that it's overhead work so my arms got tired. And you need strong hands to clip them in on the corners. We ended up drilling the holes for the corners, but then screwed the corner clips in after we put the corner clips on the track. Much easier. Highly recommend using two people and two step ladders to install them. They come coiled in a small circle. We coiled them into a large backwards circle (say just over 2 wraps*), then used velcro to hold them together in their backwards circle, then put them out in the sun each day for two or three days. We actually had them coiled backwards for about a week. This took out the shipping curve nicely. *you don't want to use too small a circle or you can reverse kink them - ask me how I know :-) Add some backdrop fabric and some drapery tape and you get a fun curtain. The curtains were easy to hang on the hooks and they slide on the track and around the corners with ease. After they hang for a couple of weeks, I'll steam them, press and hem them, and I'll be done.
D**S
Super. Après un an d'utilisation. Toujours content
J**M
Good Quality
Relatively straightforward to install on a bay window as it is a good quality, flexible track. Wise to purchase extra accessories (gliders, hooks etc. to complement those supplied).
N**U
Bon produit
Pour installer des rideaux au plafond difficile à utiliser beaucoup de trous à faire tout les dix centimètres !!et le plastique très dur un peu déçu surtout à installer
A**M
Easy Enough to Install and Great Results
Product was easy enough to install in my RV and the result is very good, with the drapes gliding effortlessly along the track. As other reviewers have pointed out, the track is quite sturdy and difficult to straighten out. I found a measure of success by holding down the track with paint cans and heating up the track with my hair drier (in the hot setting). The miter saw makes cutting the track to size the easiest, quickest, and cleanest option. Surprisingly, the installation brackets only hold with one screw to the ceiling. Since I had a hollow ceiling, I used hollow wall screw which are a bit bigger diameter than the ones provided. But even with one screw, the brackets held up nicely. I did both a straight installation and a curved one. In the straight installation, the curtain track easily popped into the brackets. But, for the curved installation, I ended up removing the brackets from the ceiling and installing them one at a time while attached to the track, because it was impossible to clip the track into the brackets with the brackets already installed. The fact that I was curving the track made it impossible in install otherwise (please see pictures). Still, it was easy enough to install. Once I hooked my curtains to the rollers, the end covers popped right out, along with some of the track rollers and some curtain, at the very first side push of the curtains. So I had to make a hole on both end covers and fix them to the curtain track with a screw, lockwasher, and nut combo. Ended up using 20 track rollers for one curtain (a 95" W curtain) and the same amount for the other (the set comes with 40 rollers). All this said and done, it is a fine product that holds up my heavy curtains without any issues.
P**M
Bad quality, especially the wheels.
Bad quality. Wheels got wrong size in relation to rest of the product. Avoid!
Trustpilot
1 month ago
1 month ago