

Buy anything from 5,000+ international stores. One checkout price. No surprise fees. Join 2M+ shoppers on Desertcart.
Desertcart purchases this item on your behalf and handles shipping, customs, and support to South Korea.
💪 Seal smarter, not harder — stop leaks before they start!
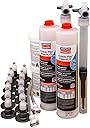
The Simpson Strong-Tie CPFH09KT Crack-Pac Flex-H2O is a 9 oz. polyurethane injection kit designed for sealing seeping or mildly leaking cracks in concrete and masonry. Water-resistant and compatible with standard caulking tools, it expands to fill voids and can be used on dry cracks with water activation. Adjustable cure time offers precision control, making it an essential industrial-grade solution for durable crack repair.


| ASIN | B00QKZEWW6 |
| Best Sellers Rank | #82,419 in Tools & Home Improvement ( See Top 100 in Tools & Home Improvement ) #67 in Step Drill Bits #791 in Drill Bits |
| Brand | Simpson Strong-Tie |
| Brand Name | Simpson Strong-Tie |
| Compatible Material | Concrete, Masonry |
| Customer Reviews | 4.5 out of 5 stars 285 Reviews |
| Included Components | Sealent |
| Item Form | Gel, Liquid |
| Item Type Name | Simpson Strong Tie 9oz CRACK-PAC FLEX H2O KIT W/ACCESORIES (CPFH09KT) |
| Item Weight | 4.4 Pounds |
| Manufacturer | Simpson Strong-Tie |
| Material | Polyurethane |
| Material Type | Polyurethane |
| Model | CPFH09KT |
| Number of Items | 1 |
| Part Number | CPFH09KT |
| Style | Industrial |
| Style Name | Industrial |
| Surface Recommendation | Concrete, Masonry |
| UPC | 707392538806 |
| Unit Count | 1.0 Count |
| Water Resistance Level | Water Resistant |
Y**R
Great product that works.
I have a basement crack that stayed dry for years and only started leaking slightly a few months ago. I knew this product from a friend long time back and when it happened I decided to give it a try. Before the purchase when comparing between the epoxy version and this one, I received a few advices from people around and the conclusion is simple : if it isn't a structural problem (which it wasn't for me, fortunately) and you don't want to or can't seal the other side of the wall, use the foam. Thus I bought this. I live in greater Boston area and I ordered it in Jan when everything was frozen after a big rain (yes, a rain in January before the historical snowfalls were recorded later the same year). So the ground temperature was probably below or close to freezing. I called the customer service and they suggested if the temperature inside is above 40 it is good. Although I didn't take the chance and waited until late March instead, when the snow was almost gone and outside temperature was around 50. Basement temperature was always about 55 to 60 so there wasn't any problem there. Anyway I agree with most of other reviewers that this thing does work. Plus I have a few additional things/tips to share here. 1. Pay extra care when you attach those ports, I only figured out that most of my leaking holes happen around the ports during the foam injection. Seal the port's base completely before moving to next one. 2. Only mix a small portion of the epoxy. You will have at least 5 mins to use them so don't hurry yourself. Also don't worry about the epoxy may run out -- it probably wont. My wall is 8 feet tall and now I still have about 1/5 to a quarter left in jars after the job was done. 3. Do inject water through ports first. Put aside the needed moisture, water could be an indication that the foam is moving up -- before the poly, you will see water coming out of the port above the one that is accepting your injection. 4. When injecting the last port (the highest one), be careful about overflow as there won't be any indication of "enough". I made a little mess there when the fluid flew over out of the top of the wall even if I sealed the crack there too. Overall it is a great product and relatively easy to apply, as long as you follow instructions and tips posted here and by other reviewers. After another few rainfalls and snow melting, my crack is still dry, more importantly the concrete around the crack is dry too -- my moisture detector shows right after a big rain the place where the water was seeping through (the dark area you can seein my photo) was only about 8% to 9%. By comparisons it was above 15% when it leaked. Only hoping it can last long as well. Good luck. Update 04/21/2015 : I wanted to remove the paste-over. So after it was completely dry -- about two weeks later, I used a steal putty knife and a hammer to chop off most of the paste-overs, then sanded the surface a bit. It cost me about another hour. But the result looks good (picture 3) . When the paste-over is off I can see the fillings in the crack. Yesterday it was a big rain storm in Boston area, and it had no leak whatsoever. So I guess I did my job well. Update 04/14/2016 : After one year, it stays sealed. More importantly the crack stays dry all year long. It really sealed the gap. No water has found its way in to my basement. Therefore I am very happy about the product.
F**H
Worked Perfectly
My leaky foundation crack started the top right corner and bottom left corner of the basement window well all the way down to the floor. I got a couple of estimates and both companies were asking $900.00. So I went to Google to see what I could find and here I am. This was so easy to do. Total time, prep to clean up was 3.5 hours on a cold Saturday morning. The lower crack cut through the bumpy seams of the concrete forms. I cold chiseled the seam as smooth as I could get, but it was not ideal. I wire brushed the crack area, which created lots of concrete dust. Wear a mask when you do this. One section of the crack was so bumpy, I had to trim the base of the injection port so it would seat more flush. I epoxied each of the ports in place. Careful not to put the port to close to floor, you need some room to work with the epoxy. Mix a small amount of epoxy but it will take longer, as the stuff does harden in about 5 minutes to the point you cannot spread it very well. Tip, Get a box of disposable gloves so you change out the gloves quickly when you get to much on the gloves, you'll go through them quickly. After the ports were epoxied in, I started to seal the crack. I radiated out from the port and stayed on a 2-3 inch line to the next port. I was mixing just enough epoxy for each run between the ports. At the window frame corners, I spread the epoxy over the metal frame. I used roughly 70% of the epoxy in the containers. I started the water filling of the ports. This is where the kit needs some improvement because it does not provide a good method to fill the ports. I took a turkey baster and piece of rubber tubing and combined it with the kits tubing. My crack initially took a lot of water before coming out the port above. As expected, I had a water leak coming out at the frame, so I added more epoxy to that area. Amazingly, the concrete seam that I straddled with the injectors were functioning properly. I was ready to start injecting the polyurethane at this point. Works exactly as everyone in this blog states. I didn't think any was going in because the caulk gun trigger was hard to pull. The viscosity of the stuff is deceiving. Next thing I know is the foam is coming out of the port above and quickly moved to the next port. TIP: Hold the port in with while you are injecting because the back pressure of a small crack will push the port in the closed position. After all the ports were filled, Green foam was visible through the edge of the window frame. Small holes in the concrete also oozzed the blue/green foam. It was awesome. The visible foam is a good indicator that the urethane is expanding and sealing. It continues to expand slowly for another 5 minutes. Here's were I deviated from the instructions. I left the injection ports in. You won't be disappointed in the product, and yes, you can do it yourself. There's even a couple of YouTube videos to increase your confidence and save yourself a lot of money.
M**E
Wide crack repair
Easy to follow directions and found a video or two on YouTube.the house was built in 1959. The photo is before I used the product. It was fill with a flexible Masonary caulk of some sort in the 90s at least. Poured foundation. We had a egress window installed. Crack was patched by egress guys sice they had the machines to dig. The was barely noticeable outside but wide and deep on the inside. Crack was 1inch wide and at least 1/2 deep in parts before I used a v notch grinder disc to clean up the crack for best penetration of the product. I used a mesh tape so I did didn’t fill the crack with epoxy putty. Since the crack was wide and deep it used 90% of the epoxy putty. Worked nice. Wish it was in a tube with mixing straw for easier application. Set’s pretty quickly, which meant working on small batches. The polyurethane solution that inserts into ports sets at a nice speed. Little messes but works amazing! Very deep penetration. Haven’t had any leaks! The product itself is five stars but like I stated earlier the two part epoxy tube with mixing straw would’ve made the application on a horizontal surface a lot easier and less messy. Plus, it would’ve given the correct ratio of resin to Hardner for a better faster cure time. Other than that, I don’t complain about it.
S**H
Working so far
We've used 2 of these kits and only wish I had known about them sooner. Why the kits aren't on store shelves, I don't know. It's brilliant, fairly easy, and the bottom line is: IT WORKS TO STOP WATER. Don't hesitate to try this method. As with so many things, preparation of the work area is KEY! Epoxy tips: Use a little epoxy at a time, or you'll waste it, and there isn't enough extra to do that. Once it hardens in a few minutes, it's no good and you have to mix more. I would mix (on throwaway cardboard) about the same volume that would fit inside a peanut butter jar lid. The wooden sticks supplied work fine until the epoxy starts to harden. Use 3 sticks. One for each container plus one to mix with. If the sticks mix, then you'll have chunks hardening in the container and you don't want chunks! Sturdier sticks are better but not necessary. Always use gloves. Buy extra, as the ones supplied are fairly poor. The epoxy will tear up your skin if it dries on it, and there's no good way to get it off. Before you even think about prepping the polyurethane, test your epoxy seal by running water through the open ports. This validates the consistency of the crack and seal of the epoxy. I utilized a small medicine syringe (maybe 5 oz?) filled with water. If it leaks through the epoxy seal, fix it and wait 10 minutes and do it again. Otherwise the poly will leak out too and not only does it create a yucky new mess, you won't get the sealed pressure needed to push upwards to the next port. A couple of pinhole leaks won't be a major problem but focus on the bottom of the crack and any large (>1 mm) leaks. The water is also necessary for the poly to react and begin foaming. If you have corner cracks, get the corner ports (EIPX-EZ). Would be nice if they included some, but just know that the flat ones are impossible to get into a corner. They have to be drilled into the wall but that's not hard with a masonry bit (1/2" I think?). Be sure to blow out the hole with compressed air before applying the epoxy. Prep enough crack and get enough ports ready to do the whole poly tube or you'll waste it too. Once the tip/nozzle hose gets clogged with foam it's a mess and potentially impossible to get it flowing again. Start applying at the bottom. Once the poly flows into the port, keep going until the caulk gun has a considerable amount of pressure. If you see major leaks, you'll have to stop and re-seal. Again, minor leaks (<1mm) probably aren't enough to stop. Be patient, keep the pressure on, and in about 4-5 minutes, poly and water will start to drip out of the port above it (and it's a great feeling!). When that happens, the foam has worked its way through the voids in the crack, and it's time to move up. Once it comes out the top...you're done! Again, the bottom line is that it works. I had tried hydraulic cement on one crack and despite a lot of work it never really fixed the issue. Anyway, after applying the poly, I waited for a big rain and found 2 smaller cracks that I had not seen before, but the bigger cracks were dry!
T**I
Fixed My Leak
This stuff works great. I followed the easy to understand instructions and within an hour, I was done with a crack thar spanned the entire height of my foundation. The gray epoxy dried quickly so I was able to start using the crack pac quickly. It's been over a year since I used it and even in the heaviest rain, there have been no leaks. This is by far the best and cheapest solution to fixing a crack in your foundation. It's very flexible so there is no need to worry about temperature fluctuations.
M**E
Works Awesome - Don't be Intimidated.
Really good quality product! Had a good size crack in the basement wall of our nearly 80 year old home. Had to do some concrete patching to level the wall to make a good place to install the port. I used a framing nail to keep the crack open while doing the concrete patch, and then epoxied the port onto the wall. Take your time installing the ports, and ensure your epoxy does not have any pinhole leaks (it can be a real mess). We used a total of 4 tubes of the polyurethane mix. We ran the hose down the outside of the house, and followed the directions from the inside. We actually had foam extrude from a hairline crack on the outside of the home, and we truly feel that this water proofed our basement wall. It is a good amount of work to prep the wall, and get the job done, but not so much that it should be intimidating to any homeowner. Likely saved us hundreds if not thousands of dollars to do it ourselves. Don't be intimidated by the project. Our wall had cracked evenly, and it was not settling away from itself, and this was just a water intrusion crack.
O**N
Excellent kit
Overall an excellent crack repair kit. I had a couple of cracks in my basement walls that would seep water in heavy rain. One crack I dug up on the outside of the house and repaired with hydraulic cement and a paint on waterproofer. That was before I discovered this method of crack repair. There are two primary Simpson brand kits, the epoxy kit that injects an epoxy that will get very hard and this urethane kit that injects and turns into a dense yet flexible foam. My home is around 15 years old and I have not noticed the cracks getting any larger but I chose this urethane kit for the way it expands in the crack and based on the other reviews. The kit is relatively straightforward. Instructions are included and were somewhat confusing but there are online videos that are more informative. The small fittings that each injection nipple has is an excellent design and the quality of the kit I felt was very good. As far as using the kit goes, mixing the 2 part epoxy is pretty standard. Use a 50/50 ratio and only mix up a little at a time so it does not harden before you are done applying it. There is enough for a standard basement wall crack in the kit of the 2 part epoxy and the injection nipples. For the crack I was fixing I only used one of the two urethane tubes so they had included more than enough of that item. Mixing the urethane and injecting was straight forward. The injection ports do want to push out and close themselves under pressure so it helps to keep them pushed in while injecting. Go slowly. This stuff expands very well. I did not seal off the top of the cement wall I was repairing and not long after injecting the last port at the top the urethane foam started coming out of the top of the wall both inside and outside of the basement. After the repair it has since rained several times without even a hint of moisture coming into the wall. Well worth the money and easy to use for a hands on person. The only other items you'll need is a standard caulking gun and extra gloves as well as a wire brush or wire brush attachment for a drill to prep beforehand. A spray bottle or some way to inject water before hand is helpful. A blow gun to blow concrete dust from the crack is helpful. The urethane foam is very durable and adheres to the cement very well. Would not hesitate to recommend or use again. Now I need to purchase some more 2 part epoxy and injection nipples to use my left over tube of urethane on the other crack I fixed with a day's labor of digging and hydraulic cement even though it has remained dry just for good measure.
E**O
Inaccurate info and poor customer service
I generally do not write negative reviews but the customer service from the Simpson sales representatives was incorrect and rude. Prior to purchasing this product I contacted Simpson support and stated that I have a vertical corner joint that is leaking and asked what was the best product to purchase. The rep told me that this was the correct kit to purchase and contained everything I needed to seal a corner joint. The rep was clearly wrong as there is no corner ports included with this kit. I called customer service after receiving the kit and explained that I was mislead. I asked that Simpson make it right by sending me out just the corner ports, but he refused and indicated that they do not sell directly to the public. I asked if he could contact the seller and have them send me out the ports, he stated that he “ cannot tell them how to run their business” and that I would have to just “ deal with it and buy the correct corner ports”. Make sure if you need to fill a vertical corner crack you separately order the EIPX-EZ-RP20 E-Z Click Drill in-Corner Epoxy Injection Port- and don’t forget the masonry bit! Overall good product but only 1 Star for customer service.
Trustpilot
3 weeks ago
2 months ago