Description
⚡ Elevate your DIY projects with pro-grade touch precision and vivid HD clarity!
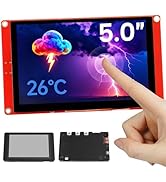
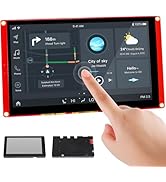
- CRISP 800 X 480 HD DISPLAY - Experience vibrant visuals with a wide 170° viewing angle, perfect for professional multitasking and presentations.
- POWER SMART BACKLIGHT CONTROL - Customize brightness or switch off backlight to save energy during long work sessions or on-the-go projects.
- COMPLETE ACCESSORY KIT INCLUDED - Get started immediately with touch pen, HD adapter, copper pillars, and dedicated support—no extra purchases needed.
- INDUSTRIAL GRADE RESISTIVE TOUCH - Operate seamlessly with gloves or stylus in any environment—dust, moisture, or hustle—ensuring durability and precision.
- PLUG PLAY MULTI DEVICE SUPPORT - Effortlessly connect to Raspberry Pi 5/4/3/2B/Zero, Banana Pi, Jetson Nano, or Windows PCs with HDMI and USB interfaces.
The ELECROW 5-Inch Resistive Touch Screen offers an 800x480 HD TFT LCD display with a durable resistive touchscreen supporting gloved or stylus input. Compatible with a wide range of devices including Raspberry Pi models, Banana Pi, Jetson Nano, and Windows PCs, it features HDMI and USB connectivity, manual backlight control for power efficiency, and comes with a full accessory kit for immediate use. Ideal for professionals seeking a compact, versatile touchscreen solution with industrial-grade reliability.