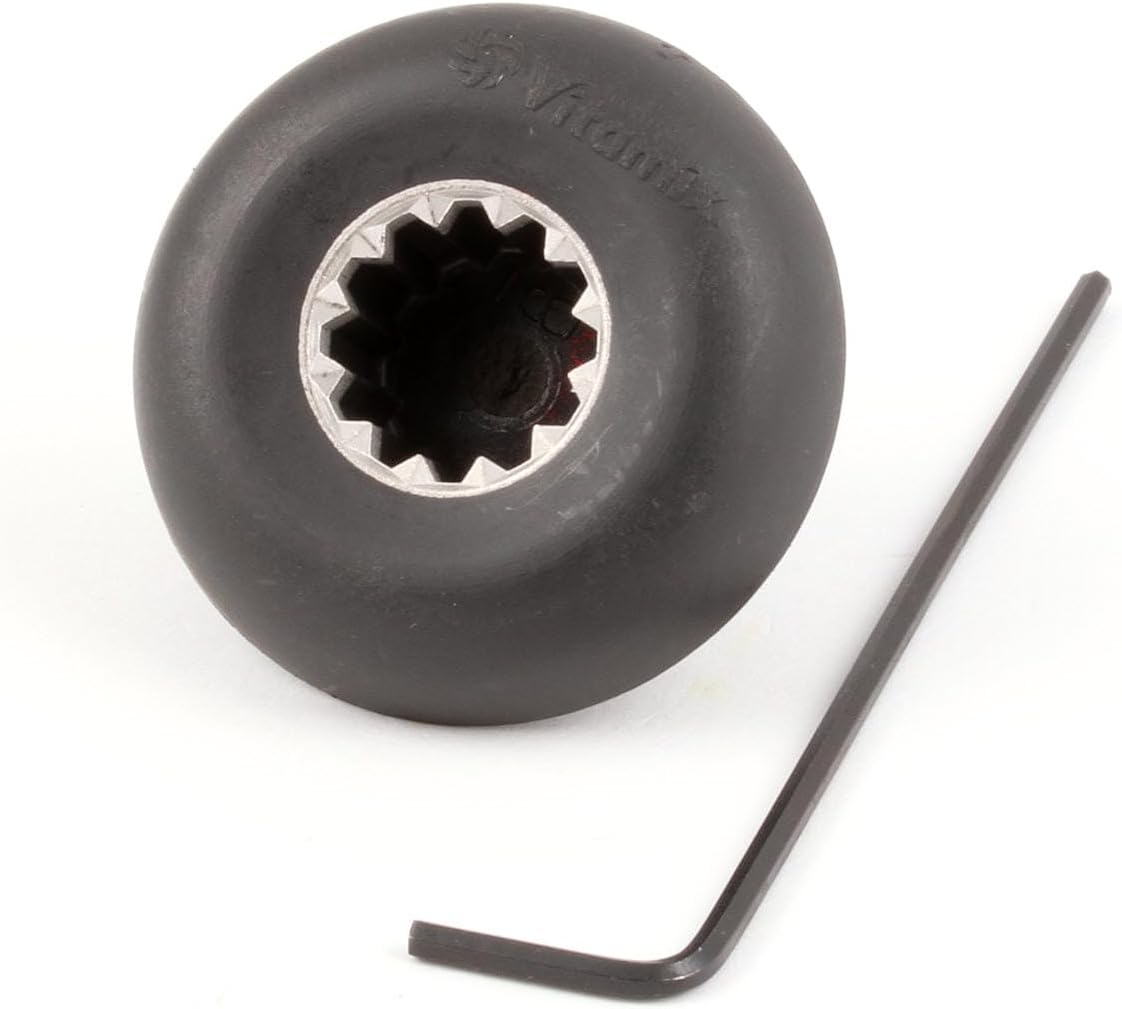
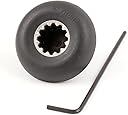

⚡ Upgrade your blend game with OEM precision and DIY ease!
The Vita-Mix 000891 Drive Socket Kit is a genuine OEM replacement part designed for Vita-Mix professional blenders. Featuring a durable stainless steel 1/4 inch hex shank direct drive system with a powder-coated finish, it ensures reliable, long-lasting performance. Easy to install with included tools and instructions, this kit extends the life of your blender while maintaining original equipment safety and quality standards.

| ASIN | B01858K0LW |
| Bit Compatibilities | Vita-Mix blender bits |
| Brand | Vitamix |
| Date First Available | April 6, 2014 |
| Drive Bit Shank Style | 1/4 inch hex shank |
| Drive System | Direct Drive |
| Finish Type | Powder Coated |
| Is Discontinued By Manufacturer | No |
| Item Length | 7 Inches |
| Item Weight | 1.44 ounces |
| Item model number | VM000891 |
| Manufacturer | Vita-Mix |
| Material | Stainless Steel |
| Number of Pieces | 1 |
| Set Name | Single Kit |
L**B
Easy to install
This repaired my Vitamix Blender and saved me tons of money because I did not have to purchase a new blender. This item is easy to install and well made.
J**J
Perfect Replacement to Renew and Revive a Vitamix
I found this easy to install and it appears to be a perfect match to the one my old Vitamix had that simply wore out due to years of use.. I was hesitant at first, as I had guessed that it would be a challenge to replace, but actually it was extremely easy to do. I made a video to show the steps to anyone else feeling trepidatious. The handy bent-nosed tweezers I used in the video to easily work with the set-screw plug were these https://amzn.to/3JDTDPb in case that's helpful to anyone wanting to do the same. The Kit I received included: + the replacement socket itself + a 5/64" Hex Wrench + a set-screw plug to replace the one you will remove + printed instructions that included steps and images (well-written) The Summary of Steps are: 1) Unplug the unit from the electric outlet 2) Remove the centering pad by lifting up each corner and gently pulling upward 3) Locate the set screw location. (Depending on your vitamix model, you may need to rotate the vitamix. My set screw was on the back of the vitamix.) 4) There is a silicone seal over the set screw. Remove this silicone seal, or puncture through the silicon in order to access the set screw. 5) The drive socket has an arrow printed on it. Rotate the arrow until it lines up with the set screw. 6) Use the hex wrench to loosen the set-screw by turning it counter-clockwise. 7) Pull up to remove the drive socket. 8) Push the new drive socket straight down onto the motor shaft. 9) Use the hex wrench to tighten the set-screw by turning it clockwise. ** Do not overtighten.** 10) Back it off one-quarter turn and make sure there is a small amount of play up and down with the drive socket. 11) Place the set screw cover, or alternatively, some silicone sealant over the set-screw area to prevent any liquids from getting into the motor housing. 12) Replace the center pad, with the Vitamix logo facing the front side of the blender. That's it! You've done it! Plug the Vitamix back in to an electric outlet and enjoy! I uploaded a video to demonstrate all this for those who prefer visual information. Overall, I am delighted at the abundance of replacement parts available for Vitamix here on Amazon. This makes it easy to maintain existing models and recycling/reusing/extending product life rather than creating landfill waste. Big plus!
S**N
Fits Like A Glove
My vitamix mount was warn out due to over usage and needed replaced. So bought an oem piece which came in a sealed bag with an allan wrench, screw and cover. Unit does show the oem print on it. Also when I install it feels tough and detail instructions. That was very helpful and made the install faster. While unit was install it have a dust or water proof cover plug as you can see in the picture which looks like a little rubber nipple. Been using it a few times and performance was great. And the fit was spot on which was great for the value. I just wish it was a few dollars cheaper since it’s rubber and can be worn out quickly with a. Lot of usage. But overall it’s perfect would definitely buy more.
T**R
Very, very happy!
Very happy with this. Replacement was a bit tricky, but if I can do it, you can, too. Now my mixer works perfectly! Did I mention that I'm very, very happy!
S**.
An Easy Fix!
What an easy fix! The drive socket on my VitaMix (Explorian Series E320) broke a few days ago; and after verifying that this was the replacement part I needed with VitaMix, I ordered it. Installing the new drive socket once the part arrived took less than two minutes! The process is so simple that any adult could do it. The kit contains the drive socket, necessary amen wrench, a black rubber stopper (to replace the bead of food-grade silicone covering the screw hole), and detailed instructions with pictures. For those who prefer video instructions, you can find a how-to video from VitaMix online.
A**7
Drop in and play
After 15 years of use, the drive socket on our Vita-Mix blender was worn out, but this replacement kit was a perfect drop-in fit. The instructions that came with it were really clear and easy to follow. Installation was straightforward, and the whole process went smoothly and got our blender working like new again. The blender is running smoothly, and we’re back to making smoothies with no issues. Definitely a great replacement part!
A**U
This is old one delivery not one time 2 time
D**A
This socket was easy to screw into my Vitamix and works exactly like the original. I’m back to blending again!
S**A
Excelente, funcionó perfecto
K**H
It took me a couple days to confirm but this part does work as a replacement for Vitamix Explorian E310. Part is plastic and metal, well built. Comes with proper instructions on how to remove and replace. The included Alan key is helpful, just get some food safe silicone to seal off the hole to make sure your drive unit stays dry.
A**R
Great quality, fits perfect and works as if it was original part.
Trustpilot
2 months ago
5 days ago