Desertcart purchases this item on your behalf and handles shipping, customs, and support to South Korea.
🎯 Upgrade your game control—precision repair, zero drift, total domination!
The ElecGear 8X FU 10K Trimmer Potentiometer is a high-precision replacement sensor designed for analog joysticks in PS3, PS4 DualShock, and select Nintendo Switch Pro controllers. Featuring a 3-pin design for easy soldering and installation, it includes 10 correction resistors to combat joystick drift at the hardware level. This potentiometer is specifically compatible with Favor Union (FU) joysticks and is a cost-effective solution to restore joystick accuracy and responsiveness without replacing entire modules.
| ASIN | B07SKX5K2S |
| Additional Features | Drift Fix PCB |
| Best Sellers Rank | #6,935 in Video Games ( See Top 100 in Video Games ) #42 in PlayStation 4 Accessory Kits #2,388 in PC Accessories |
| Brand Name | ElecGear |
| Button Quantity | 16 |
| Color | ALPS 2.1KΩ Potentiometer |
| Compatible Devices | PS5 DualSense, PS4 DualShock 4, Xbox One, Xbox Series S|X, Switch Pro |
| Compatible Video Game Console Models | Sony PlayStation 4, Sony PlayStation 5 |
| Connectivity Technology | USB |
| Controller Type | Joystick |
| Customer Reviews | 4.3 4.3 out of 5 stars (736) |
| Hardware Platform | playstation 4 |
| Item Weight | 60 g |
| Manufacturer | ElecGear |
| Manufacturer Part Number | 3Pin-Sensor |
| Model Number | 3PIN-Sensor |
| Package Quantity | 1 |
| Power Source | Wireless |
| UPC | 797550074673 797550074284 |
G**Z
Good
These potentiometers looks almost as long as the original ones. No complains at all.
A**M
Fixed my Drift issue
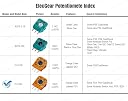
I purchased these to fix a drifting issue on one of my Playstation 4 controllers. Worked like a charm. No more drifting and I didn't have to spend 60+ dollars on a new controller. Make sure you identify the Potentiometer in your controller before purchasing. Refer to the picture with the Potentiometer index to get the right ones for your controller. 5 out of 5 stars.
S**I
Very high quality anolog chips
I wasnt sure if these would be good to buy but when I got them, I looked them over and they are very high quality. Im impressed, I havent installed them yet cuz I'm lazy but will soon.
C**H
Not for PowerA ProSwitch controller
Got the parts switched out only to find they don't work for the analog stick. The stub hole that the mechanical tab goes through on the pot is to big and the stick does not engage with the inner disc.
A**R
Worked great for PS4
My first attempt I tried taking off the entire joystick module because I was afraid of breaking something, but this was actually really difficult and not necessary. You can just bend the old pot away from the module slightly, desolder it, and yoink it off. Just slide the new one in and solder. E.z. It came with some SMD resistors but I have no idea how you would even attempt to utilize them... I ignored them.
C**L
The color of the disc inside has different size holes, still fixed issue after sharing parts.
So my ps4 control has the orange 10 k version but the disc on mine are white and these are black. I swapped one out and it didn't work. so looking into it, I found that the center hole on the black is larger that the original white ones. So I used the original white center disc after cleaning it and put it in the new orange piece and problem solved.
M**Y
Do not attempt to use on PS4
I tried fitted these to ps4. Removed old pot with hot air station and tried fitting this. It is a different size on shaft so potentiometer with not fully turn. Waste of time absolute waste of my time too. PS4 controller on bench open with no parts
P**P
pas complètement compatible pour "HORI"
Le trou au centre de la pièce de remplacement est trop gros pour l'axe de la manette X-box de chez HORI, donc, ne fonctionne pas dans l'état pour moi. j'ai récupérer la rondelle noir original (partie mobile) pour la mettre sur la base orange. Bref, du chipotage. Pas encore fini ! Pour le packaging et l'envoi c'est très bien. Le plus est les petites résistances réglables pour le calibrage, c'est très bien vu ! J'espère que mon bricolage fonctionnera =-D Édit: Ça n'a pas marché, je vous conseil de remplacer le stick directionnel complet.
A**X
Perfekter Ersatz für Stick-Drift – Mein Switch Controller läuft wieder wie neu!
Ich habe mir das Set der "ElecGear 8X FU 10K Ersatz Trimmer" bestellt, um den extrem nervigen Stick-Drift bei meinem Minecraft Nintendo Switch Controller zu beheben. Die 10K Ohm Potentiometer sind absolut passgenau und ersetzen die fehlerhaften Original-Sensoren einwandfrei. Wer schon mal einen Lötkolben in der Hand hatte, bekommt den Austausch gut hin. Das Tolle ist: Man muss oft gar nicht das komplette 3D-Joystick-Modul mühevoll auslöten. Es reicht in den meisten Fällen, die alten seitlichen Trimmer aufzuhebeln, auszulöten und durch diese neuen zu ersetzen. Nach einer kurzen Kalibrierung in den Konsolen-Einstellungen reagiert der Controller wieder extrem präzise und zentriert perfekt. Für diesen Preis ist das Set ein absoluter Lebensretter für defekte Gamepads. Klare Kaufempfehlung für alle, die sich eine Neuanschaffung sparen wollen!
A**N
Es Perfecto
No tiene el 10 porque el envío se retraso aún siendo prime, el producto es perfecto viene la pieza completa tuve que extraer el potencimetro interno y cambiarlo en el Mando. Me ha ahorrado 90€ Me ha solucionado el problema del derrape de los joystiks
M**E
Ottimi trimmer per riparare un Controller PS4
Ho acquistato questi trimmer di ricambio per riparare la levetta analogica destra del mio controller Sony DualShock4 V2 Camo e si sono rivelati utilissimi e di ottima qualità. Grazie a questo kit si potrà risolvere definitivamente il fastidioso problema del drifting, che purtroppo affligge le levette analogiche dei controller dopo mesi/anni di utilizzo. Questo problema non si potrà risolvere in altra maniera se non sostituendo il piccolo componente metallico all'interno del trimmer, che purtroppo si usurerà in maniera graduale con il passare del tempo. Ovviamente non è richiesta nessuna saldatura o modifica elettronica alla scheda ma soltanto un po' di manualità e pazienza. 📦CONFEZIONE Il kit arriva in una piccola confezione gialla ben protetta dagli urti (FOTO1), dove all'interno troviamo una scatolina in plastica contenente 8 trimmer da 10Kohm, un manuale e un piccolo cacciavite (FOTO2). ⚒️COME EFFETTUARE LA RIPARAZIONE ATTENZIONE: Prima di acquistare il kit consiglio di smontare il controller e verificare quale trimmer serve, ne esistono di 2 tipi (verde e arancione), ognuno dei quali può avere diversi valori di resistenza. Questi valori si possono leggere in un lato del trimmer stesso, dove sono riportati dei numeri scritti in bianco (FOTO 3). Una volta individuato il tipo di trimmer procedere come segue: 1) smontare completamente il controller, se non si è pratici consiglio di seguire qualche tutorial su internet. 2) aprire i 2 trimmer all'interno del controller, in corrispondenza della levetta analogica difettosa, aiutandosi con il piccolo cacciavite fornito in dotazione e facendo leva delicatamente sugli incastri. 3) controllare il verso in cui è posizionato il componente metallico del trimmer originale (FOTO 4). Questo è importante poi per rimettere il nuovo, infatti se si metterà nel verso sbagliato si rischierà di danneggiare il componente metallico del trimmer o che il controller non funzioni correttamente. 4) togliere delicatamente il componente metallico all'interno del trimmer, aiutandosi con delle pinzette. 5) ora sarà essenziale munirsi di un cotton fioc e di alcool etilico denaturato al 90% (meglio se isopropilico) e pulire minuziosamente tutto l'interno del trimmer, in particolare tutta la sede di color nero dove scorreranno le alette del componente metallico del trimmer. La pulizia delle sede interna è importantissima, infatti troveremo molta sporcizia che potrebbe compromettere il corretto funzionamento. 6) ora si potrà inserire il nuovo componente metallico all'interno del trimmer del nostro controller. Per fare questo basterà togliere il componente metallico dal trimmer nuovo appena acquistato ed inserirlo delicatamente nel trimmer del controller (rispettando il verso delle alette). 7) chiudere delicatamente il trimmer del controller fino a che non si sentirà un click. Eseguire questa procedura per tutti e 4 i trimmer del controller. 🟢PRO - Confezione semplice ma contiene tutto il necessario per la corretta sostituzione dei trimmer originali. - Trimmer di ottima qualità, risolveranno al 100% il problema se la procedura verrà fatta correttamente. - 8 trimmer permettono di riparare ben 4 levette analogiche (2 trimmer per levetta). 🔴CONTRO Nulla da segnalare.
Trustpilot
4 days ago
3 days ago