


Buy anything from 5,000+ international stores. One checkout price. No surprise fees. Join 2M+ shoppers on Desertcart.
Desertcart purchases this item on your behalf and handles shipping, customs, and support to South Korea.
🖥️ Upgrade your Surface Pro 7 with a screen that’s as sharp as your ambition!
This premium 12.3-inch LED LCD touch screen replacement is tailored for the Microsoft Surface Pro 7 (2019) model, featuring a stunning 2736x1824 resolution and precise digitizer technology. Rigorously tested and backed by responsive customer support, it ensures a seamless upgrade experience for professionals demanding clarity and reliability.


| ASIN | B09TWHW29N |
| Are Batteries Included | No |
| Best Sellers Rank | #124,583 in Computers ( See Top 100 in Computers ) #188 in Laptop & Netbook Computer Replacement Screens |
| Brand | PEHDPVS |
| Color | 2736x1824 |
| Customer Reviews | 4.2 4.2 out of 5 stars (73) |
| Date First Available | 24 March 2022 |
| Item Weight | 798 g |
| Item model number | Surface Pro 7 (1866 ) |
| Manufacturer | PEHDPVS |
| Package Dimensions | 36.3 x 26.19 x 4.39 cm; 798 g |
| Standing screen display size | 18 Inches |
A**E
Alles prima, Detail beachten …
Alles prima, nur ein Hinweis fehlte, dass der Touch erst zur Funktion kommt, wenn man mal ins bios geht und von dort mit Abspeicherung wieder raus geht. Danach alle Funktionen gegeben und passt prima und ist inklusive der benötigten Klebestreifen.
T**N
Installed & Works Great - But See Review...
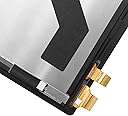
The product was great, well packaged, but there are some things to know! First, do not damage the fully detachable display cable from the old screen. Remove it and keep it for the new screen. Also, try to retain the covers for the 2 speakers, one on each side towards the top of the screen. Otherwise, your replaced screen will show 2 metallic sets of holes in the notches for the speakers. The cable connectors can be tricky, including the one for the power supply. You need the right type & size of screwdriver. In addition, there is a very small spacer circuit board that fits between the main board and connector. Make sure to not lose it & note its orientation, this is critical. Snap the snap-in connectors in place very carefully, ensuring they line up correctly. You should feel/hear it "click" into place. Screw in the connector end, making sure to line up the screw absolutely vertically. Very fine tweezers designed for electronics can be used to hold the screw to get it started. Be careful to not let the screwdriver slide off, it could damage the circuits around the connectors. Before putting things back together, boot up the tablet to make sure everything works. Lean the screen against something so you can see it & be careful to line it up to not put extra strain on the cables. I also reused the metal flange from the old screen that covers the snap-in connector on the screen. I used Gorilla Tape to hold the connector on the screen in place first, as it is easy to disengage it. I then used Gorilla Tape to hold the flange in place. I also used Gorilla Tape for the connector from the screen to the main board, the one that does not have a screw-in mechanism on the main board. (The other end of that cable is essentially bonded to the screen). Verify everything still works before sealing it all up: Apply some form of double-sided electronic device tape to just the outer edge of the shell, all around. Be careful to not cover the microphone, camera & privacy light at the top middle of the shell. Very carefully & gently lower the new screen onto the shell. Using your fingers as guides, make sure everything lines up before pressing the screen in place. You don't want to risk breaking the new screen disengaging it from the wrong tape contact points. Verify everything still works!
A**D
الجودة مقابل السعر مممتاااااااز جدا
اللمس رائع جدا وألوانها ممتازة وكأنها الأصيلة شكرا أمازون
J**S
Screen replacement works great so far. Don't try this if you haven't done one before.
Client had a badly cracked screen. Ordered this as a replacement and it worked as expected. Initial power on and the screen had a pink hue, but a simple reinstall of the graphics driver solved this problem. The bad in this situation is basically the repair process itself. Especially if the original screen is badly damaged. As an experienced tech I can replace laptop screens all day without issue. This is my 3rd surface pro screen replacement and it still takes me hours to complete. If you dare attempt this as a first time DIY, study some YouTube videos extensively before even ordering. Hopefully those will scare you enough to rethink your plan. If not, take your time and don't try to force it too quickly. You'll just end up shattering the glass. Possibly sending tiny shards into your eye because you failed to follow the How To video warning to wear eye protection, drastically increasing your overall costs once you pay the doctor bills. Then when you get back home you find the rest of the project even harder to complete because now the screen just wants to break more and more as you go. Tip, use clear packing tape over damaged areas to reduce breaking and glass shards. During separation of the glass WATCH OUT FOR THE WIFI ANTENNA! If you studied some videos they should warn you about the same. If not careful you will likely rip them out without even noticing it. If that happens, then you will need to replace them. Or just stay closer to the router to get a decent signal from now on. Good luck.
N**K
Very happy with this product!
Adhesive was precisely cut. Install was easy. Removal of the cracked screen is hard part, you need a heat gun to get the old screen loosened up, a hair dryer might work as well. Look out for flying shards of glass, wear eye protection! The screen worked as soon as I powered it up. No dead spots and touch worked great from corner to corner. Overall satisfied. Attached the adhesive to the screen then tested. Exposed the backing from the adhesive once it tested out then pressed the screen in place. Perfect fit.
Trustpilot
2 weeks ago
5 days ago