


Buy anything from 5,000+ international stores. One checkout price. No surprise fees. Join 2M+ shoppers on Desertcart.
Desertcart purchases this item on your behalf and handles shipping, customs, and support to South Korea.
🚀 Elevate your IT setup with the rack that adapts, supports, and moves with you!
The VEVOR 12U Open Frame Server Rack is a versatile, carbon steel network rack designed for professional-grade equipment storage. With an adjustable depth of 23 to 40 inches, it fits a wide range of AV and networking devices while supporting up to 500 lbs when ground-mounted. Its ergonomic open frame design ensures optimal airflow and easy access, complemented by casters for mobility and wall-mount options to maximize space. Complete with all necessary accessories, this rack is ideal for offices, retail, and limited-space environments seeking a reliable, flexible, and professional-grade solution.


| Asin | B0C64X8J8R |
| Best Sellers Rank | #38 in Computer Racks & Cabinets |
| Brand | VEVOR |
| Built In Media | 1 x Open Frame Server Rack 2 x Pallets |
| Color | Black |
| Compatible Devices | Server |
| Customer Reviews | 4.1 4.1 out of 5 stars (898) 4.1 out of 5 stars |
| Enclosure Material | Carbon Steel |
| Is Assembly Required | No |
| Item Dimensions D X W X H | 40"D x 20.1"W x 24.6"H |
| Item Weight | 31.2 Pounds |
| Manufacturer | VEVOR |
| Mfr Part Number | 12U Open Frame Server Rack |
| Model Number | HT-W6412 |
| Mounting Type | Floor Mount,Wall Mount |
| Size | 12U |
| Upc | 840281575923 |
| Warranty Description | 2 year |
| Weight Capacity | Minimum weight: 150 Pounds |
User
Lots of screws, you will need a power tool, leave things loose until fully assembled.
First off, this thing is extremely sturdy and totally worth the price, but absolutely cannot be assembled by hand. You will definitely need a high-torque screw gun of some kind, such as a drill with an adjustable torque setting. Although the screw holes in each piece of metal are somewhat threaded, they take a large amount of force to turn into the metal and secure deeply. I had a Dewalt drill set to level 10 torque, and in some cases I had to increase that. Needless to say I was surprised that I did not have one single screw that became stripped out, although they appear to give you about 50 extra screws just in case you have lots of trouble. Don't forget to adjust the torque though, you wouldn't want to have a drill on the drill setting or you'd likely strip out tons of holes. I saw some people who talked about having issues with getting things in alignment, stating they weren't able to get the corner reinforcements mounted. My advice would be to try to leave most of the screws a little bit loose until you've fully assembled everything, including the corner pieces that add stability. I could see where alignment could be an issue if you tighten everything as you assemble it, whereas if you leave everything a little bit loose you'll have some wiggle where you need it. After getting every piece attached, before installing any shelves or devices, tighten all the screws to a high torque setting on your drill/driver. It was fairly simple to tighten everything after the full assembly, all screws are still accessible. I feel like the instructions should tell you in the beginning to leave everything loose, but I didn't see it printed anywhere unless I missed it. The instructions leave a bit to be desired, take your time and study the image diagrams.
User
20U taller than described, probably all U heights the same difference...
For those having difficulty assembling this 4 post rack: Yes instructions could be better on a couple steps, but I'd guess you also have difficulty assembling most items overall anyways. Details are in the pictures on which way to assemble this 4 post open rack. Pay close attention to the pictures at the ends of the pieces, as they are shaped differently and if you note the position correctly, you won't have any issues at all.NOTE: Do not try to drill a hole with the electric drill you will need to use, once the threads are cut immediately stop when the head of the screw touches the metal.Items to note:1) The height of whatever 4 post rack you are looking at does NOT include the wheels. I bought the 20U model which stated 38.7 inches, and with the wheels on comes in at just under 41 inches.2) Weight capacity says 500lbs. No way this is even close. Instructions as another has shared clearly says 200lbs max.3) You are going to need an electric drill with a #2 bit. I used a Milwaukee M12 1/4" impact with a magnetic 4" bit extension and it worked fine. Set on power setting 1. Not one thing can you use a regular screwdriver when installing this, except to mount the 2 included shelves at the end. So if you don't have an electric screwdriver I would recommend the Milwaukee M12 series or similar.4) You don't get one of those thin flat cheap wrenches for putting on the wheels. If you want to put them on it's a 9/16 or 14mm open ended wrench. Snug is all you need for the wheels.5) The first step is the most important one, if you intend on extending the depth for you 4 post open rack needs. Instructions mention, but not a lot of detail. I set mine at 32in deep, which leaves 9 open holes on each end as you assemble the depth rails on the first step. Adjust accordingly for your depth needs.6) Also note, if you need the depth to be over the 23" default depth, the top metal piece isn't going to cover the entire top. I put mine covering the front of the rack which left me with a gap in the back. Screw holes still match on one end, and you could easily modify the back where it ends if you want to. But there will be an open space on one end since they don't know what depth you need if you want to adjust.7) Wheel thread size is M10x1.5 if you want something more sturdy instead of the plastic ones supplied. So far I haven't seen an issue, but for those putting up to the 200lb limit you might to do something different. Your call.8) Once you fully assemble all parts, gone through all the steps - just before you mount a shelf - do the following: Instructions say to put 2 screws in each expandable rail end (remember the first step mentioned above). And you did to get this far. Now that you have extra screws available, go add 2 more screws to each end of the expandable rail, and another set in between the now 4 screws you have on the expandable rails at each end(these you set to determine the depth of the 4 post open rack on the first step in the instructions). When you get done with adding these screws you will have 6 at each end of each rail - so 12 per expandable rail X 4 = 48 screws just in these expandable rails. Why? It adds a lot of strength and tightens the whole unit up nicely! No you won't get anymore weight, but you will see the difference.Overall I can't complain about this 4 post rack. This is NOT something you would use to mount up 3K+ UPS's, servers, storage, etc into. I mean, look at the price! There's a reason enterprise data center racks for business start at around $2k each and up. This isn't the same thing so expect what you paid for, not something for on the cheap. Anyone who's worked in IT, would immediately see the difference here.But for home use with up to 2x 1500 UPS in the bottom with home grade equipment racked up, it fits the job just fine! Slap a Monitor/Keyboard/Mouse on top and you're ready to go! I've already got some extra shelves coming along with some patch cables in the right length to tidy up everything on a single rack that roles when I need it to. Oh, and don't forget the 19" PDU so you can reduce down the wiring nightmare that some of us get into! :)Stop thinking about it and just order it! If you need something more heavy duty then spend the money and move along, cause that is a different class of need than trying to make this work for the real heavy stuff. Good luck!
User
A solid rack but a few" gotchas"
The rack itself is nicely made, but as others have mentioned, the M5 holes are not tapped. Although self-tapping M5 screws are furnished, they only work when the holes are perfectly aligned, and none of the corner support holes are. I ended up redrilling to align the holes and purchased some M5 nuts to fasten with the M5 bolts. Since inside corner access is next to none, I have the bolts pointing outwards with the nuts on the outside, and appearance isn't bad at all. As far as the wheels go, they are useless for after installing more than 20 lbs of equipment on them. The wheels are mounted on cross braces, not the frame itself, and the cross brace twists and skews when the rack is rolled. I got rid of those wheels and purchased some nice 4" heavy duty poly casters and mounted them to a 2 foot square piece of 3/4" plywood and placed the rack on top of this platform. Much easier to wheel and the rack is solid after bolting it down to the platform. The M5 bolts worked fine on the top plate but I strongly advise using a power screwdriver unless you have a strong wrist. My power screwdriver had enough torque to work the self-tapping M5 bolts into the frame, only because those holes lined up. Overall a very nice rack if you're resourceful and can work around the gotchas.
User
Great rack for the money
This is a great rack for the money. I was hesitant to purchase this at first because other reviews mentioned: incorrect instructions/confusing, a lot of assembly time, difficult assembly, and flimsy construction. Here are my thoughts on each:Incorrect Instructions:I found an error on page 4. I included a photo of the correction attached to this review,A lot of assembly time:I didn’t think it was too bad. It took me about two hours. I highly recommend and electric screw driver/drillDifficult assembly:Honestly, I feared the worst from the self-tapping screws. However, I was surprised that they actually worked quite well. I only stripped one screw and that was probably my fault. I highly recommend using a screwdriver extension for the hard-to-reach screws.Flimsy construction:Overall, the rack is pretty sturdy and great for light loads. I would probably not fill it full of HP Proliants, though. The wheels do not seem super sturdy, but they have not caused me yet.Overall, great rack for the money.
User
Nice home lab/small business rack.
This was a great buy. The rack was very easy to assemble and feels solid and well made. All of the parts fit together perfectly with no issues. For its size, it offers plenty of space and works great for a small home lab or a small business setup.The included shelves are a nice bonus and are perfect for lighter equipment. While they aren’t designed to support a lot of weight on their own, this wasn’t a problem for my use since I placed smaller, lightweight devices on them. If you plan to use heavier equipment, adding a bit of extra support would solve it easily.Overall, I’m very happy with this purchase and would definitely buy it again.
User
Assembly is frustratingly long
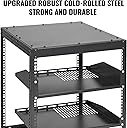
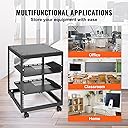
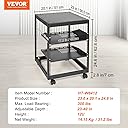
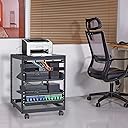
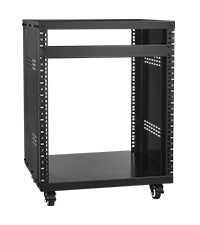
What I liked about this rack...it's 15U, which is plenty of space for my needs. Where to begin with the dislikes...The verticle rails are not labeled with the U numbers, so if that is something you find helpful when planning out your rack, you'll have to get a label maker and print numbers to put at the notched cut-outs. Alternatively, you could guess everytime you want to install something in the rack. I like the numbers, so I labeled them.It took me about 5.5 hours to put the darn thing together. Spread that time over a couple of days. Why, you ask? The instruction booklet is seriously craptastic! The images are so faded that you can barely make out which piece is which, and in what orientation they are supposed to be when connected. A couple of very helpful things I discovered. 1) The Left Corner Bracket has the two holes on the left. The Right Corner bracket has the two holes on the right. Those two holes face each other when you put them on the extender.As another reviewer indicated, the top plate is only useful at the shortest length of 15". If your rack needs to be extended longer than that, you cannot use the top plate. It is not stable and bows in the middle. My rack is extended to 32". And adjusting the length was not easy, but it was relatively straight forward.The video in the description of the product (with the images), skipped a number of important steps. Not sure why they didn't just do a whole assembly video because the descriptions in the instruction booklet are not comprehensive. You really have to figure out a great deal on your own.None of the parts are stamped or labeled L, R, T or B (for Left, Right, Top, Bottom), yet the instructions have these descriptors. Oh, and the peanut shaped holes on the top and bottom connector pieces are the back of the rack. These peanut shaped holes are what would be used if you were to hang the rack on the wall.I highly, highly recommend either an electric screwdriver or small power drill, as indicated in the instructions. Trying to assemble this thing with a manual screwdriver will ... ahem... drive you nutty crumpets. And you may want to have that manual screwdriver on hand, just in case.Lastly, the description and the pictures here say the rack supports up to 500lbs for a ground configuration. Not sure if that is entirely true, considering the instructions that come with the rack and the vendor's website both say 200lbs if the rack is on the ground. That 300lbs is a huge difference.Bottom line, if you enjoy puzzles, then this is the rack for you! If not, you may want to select something else. I'm not a big fan of frustration, especially while assembling something that should have only taken an hour at most to put together. I have yet to put more than the UPS in the rack. I'll come back to update the review after all of the equipment is in it and can test for sturdiness. As of now, the rack seems fairly sturdy, and the casters freely move on the floor. Again, will see how it is when the rest of the equipment is installed.
User
Good low cost rack
UPDATE: As others have reported, my caster/wheel welds broke with fairly light load of 1 server and consumer battery backup. Resulting in 2 of the wheels to cave/buckle. Just upfront, my comments and ratings are heavily considering the price, which was 30% less than other similar options I saw.The biggest complaint/issue for me was the packing. It came with the corner of the top cover/shelf bent up about an inch or so. I was able to hammer it flat enough to hardly notice, unless you know what you are looking for. Comes with concrete expansion bolts to wall mount, also includes the casters all with brakes. Came with 16 standard rack clip mounts and bolts that use an allen wrench (included). Not familiar enough to compare quality but 1 clip did brake after a couple add/removes.The 12 Us are labeled both front and rear side, which is nice.The 2 trays that come with it, I assume would cover most random uses, I only needed 1 of them. Having 2 though gives options (imo). I put a small battery backup on the larger shelf which did sag a little, these are heavy so not surprised.It seems sturdy enough. Nothing seems overly cheap or flimsy.Assembly is pretty straight forward, the instructions aren't great, but they aren't the worst I have seen. I did end up having to reverse some parts, some of the side bar orientation wasn't really clear in the image, but they did specifically try to call out certain features like the caster holes for proper orientation (though the same parts have the U labeled so difficult to put upside down anyways.The adjustability is a nice feature if needed (I didn't), so cannot comment of sturdiness if fully expanded. Those particular bars came pre-assembled in the shortest configuration which was nice. The instructions did include steps to put them together as if they weren't.
User
Fails where it should not.
First, understand this is for home use. I have worked in IT for over 40 years. This rack will not be reliable for pro use in a data center. Don't even try it.I got the 15U unit. There is not one thing that forces me to give it a low rating. Instead it is the sum of multiple issues.BAD: The quality is not completely poor, but poor where is counts most.1) Mine came with dents, scratches, and bent corners for the top panel. If this was the only issue, it would be forgivable. It often happens when putting it together anyway.2) There are no bolts to hold this together. Instead it is held together with screws! Yes, you heard me correctly. There are no threads in the holes. I suspect this will become loose over time without any way to tighten it because there are no nuts and bolts. Bad design! True, you could buy some and replace the screws.3) The holes often to not line up. Forget using a screwdriver! You will need a HAMMER DRILL option on your power drill. If you try to assemble this with a screwdriver, you are going to be highly frustrated.4) It comes with two shelves. The smaller is extremely flimsy. I can support a cheap home router, but that is about it. The second bigger shelf is better.5) The instructions. Sigh. Either the instructions are wrong or I am missing part (13). It shows some brackets for the adjustable sides, but they are not in the box. However, I don’t see any reason for needing them. The adjustable bars are pretty robust.6) The top panel is only the size of the standard rack depth (not enough for a server). If you adjust the depth to fit a server, it will not cover the entire top. There is no panel supplied for folks using the extended depth feature.7) The max weight is only true if using standard depth. If you extend it, max weight decreases.Good: It does have some good aspects.1) The frame itself is fairly tough. I thought it would be all cheap thin metal, but it is not. It's medium. As long as you put the heavy stuff at the bottom, I suspect it will be fine.2) You get plenty of extra screws and cage nuts. Enough for the shelves and a few network devices.3) The wheels have locks. So you can keep the rack in place without fiddling with feet. Yes, that might cause the wheels to get deformed over time, but it will be a long time.4) It is 4 post, fully open, no side panels. So, you can mount devices from the back too. That is great for PDUs or even patch panels.With some changes, this could be a great home rack. There is room for customization. You can add some support brackets yourself, if you want the shelves to hold more.Would I have paid more, for better? Yes. However, you don't know what you have until you get it and assemble it. If I could go back in time, I would not have purchased it. However, it's not bad enough to go through the hassle of disassembly and return. Catch-22One last thing to mention is that it is possible to stack these as long as you don’t make the top too heavy. Two stacked 15U units would be fine. Use some nuts and bolts to attach them together.
User
uitstekende prijs kwaliteits verhouding.
Snelle levering. Server rack heeft een uitstekende prijs kwaliteits verhouding.
User
Top
Das Rack kam zügig und ordentlich verpackt ohne Schäden an. Die Einzelteile waren sauber von einander mit Folie und Styropor getrennt. Die gelieferten Räder waren auch nicht die Bürostuhlräder aus den Produktbildern, sondern sind dem Anschein nach Schwerlasträder.Ein normaler Akkuschrauber war für mich zwingend nötig; mein kleiner und meine Hände haben nicht genug Kraft die >50 Schrauben (+16 fürs verlängern) in die Streben ohne Gewinde zu bekommen. Ich empfehle auch zumindest die Löcher für die Eckstücke (Päckchen 4) einmal trocken vorher zu schrauben, da man später mit einem Akkuschrauber nicht mehr grade dran kommt und diese von Hand reindrehen muss.Die Maße sind alle hinreichend genau, man muss halt erst anschrauben und gleichmäßig alle Schrauben anziehen. Das soll ja irgendwie auch unter Spannung stehen, sonst wackelts. Keinerlei scharfe Kanten war eine positive Überraschung, da diese sonst vor allem im günstigen DIY Bereich gang und gäbe sind.
User
Orino
Un buon prodotto e versatile !
User
Satisfait
Solid et bon prix, je recommande les produits Vevor
User
Bastante bien. Sistema de apertura endeble.
Está bastante bien. Acero de calidad. El sistema de apertura descuadra todos los elementos. No obstante si se prepara adecuadamente y se condenan las bisagras, queda muy sólido.
Trustpilot
2 months ago
5 days ago