


Desertcart purchases this item on your behalf and handles shipping, customs, and support to South Korea.
🚽 Upgrade your flush game with Kohler’s gold standard!
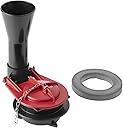
The Kohler Genuine 1039861 Flush Valve Kit is a premium replacement part crafted from durable brass, designed to fit Kohler toilets with 1/2 inch NPT barb connections. Engineered for longevity and backed by high customer ratings, this flush valve kit ensures reliable performance and easy installation, making it the go-to choice for professional-grade plumbing maintenance.


| ASIN | B005J4C3WA |
| Best Sellers Rank | #49,945 in Tools & Home Improvement ( See Top 100 in Tools & Home Improvement ) #65 in Toilet Flush Valves |
| Brand | Kohler |
| Brand Name | Kohler |
| Connector Type | Barb |
| Customer Reviews | 4.6 out of 5 stars 610 Reviews |
| Exterior Finish | Brass |
| Global Trade Identification Number | 00650531250971 |
| Included Components | Flush Valve Kit |
| Inlet Connection Type | Barb |
| Item Dimensions | 10.5 x 8.5 x 4.75 inches |
| Item Type Name | Genuine Part |
| Item Weight | 4 ounces |
| Item dimensions L x W x H | 10.5 x 8.5 x 4.75 inches |
| Manufacturer | KOHLER |
| Manufacturer Part Number | 1039861 |
| Material | Brass |
| Material Type | Brass |
| Model Number | 1039861 |
| Number of Items | 1 |
| Number of Packs | 1 |
| Number of Pieces | 1 |
| Number of Ports | 2 |
| Outlet Connection Size | 0.5 inches |
| Outlet Connection Type | Barb |
| Set Name | 1 |
| Size | One Size |
| Thread Size | 1/2 inch NPT |
| Thread Type | Barb |
| UPC | 650531250971 |
| Unit Count | 1 Count |
| Valve Type | flush valve |
E**G
Toilet flushes like new again.
Looks like this is a genuine replacement. It's identical to the original old worn out flush valve kit I replaced in our Kohler Memoirs toilet. Removing the old flush valve kit was easier than installing this new one. Took me about 10 minutes to get this in safely. I was afraid of breaking the three tabs that have to be lined up with the hole at the bottom of the tank before you twist to lock it on. Anyhow, thankfully, I got it on without damaging anything. One thing I noticed is that the flush valve kit does not have any Kohler brand marking or part number on it. I found that peculiar, but again this does look like a genuine Kohler product. It came in an official Kohler box that had a part number on it, and the fit and function of the part are perfect. Our toilet flushes like new again.
A**D
BUY TWO .INSTALLATION is terrible
Extremely difficult to install . Very easy to break during installation . Buy TWO. In case it breaks . ZERO DIRECTIONS INCLUDED. You need a water soluble lubricant to spray on the gasket. Then CAREFULLY LINE UP all three points , then insert push down very very hard to compress the gasket. Then turn only a little to little to lock in place.
M**E
Came ready to install
Absolute perfect fit for a difficult to source part!
C**T
Could be better design, but works if you install it carefully
If you have certain Kohler toilets, you have to use this odd proprietary type of flush valve as a replacement. They're made in two heights, so if you have a low-tank toilet, you need the shorter one. If you have the standard-height tank, you need the taller one that has the longer tube extending a few more inches below the flap-valve area. They look exactly the same otherwise, so make sure you get the right one. Either way, be careful while you install it, and use the new gasket that comes with it. The three bottom tabs that lock it to the tank are easy to break off if you don't do things right. I actually broke the one I already had while trying to replace just the gasket and had to buy the whole new valve. Here's what I did: Unhook the tube and chain going to the old valve. Rotate it about 60 degrees (direction doesn't matter) until you feel it release when its tabs line up with the "points" of the triangular opening it fits into. You may have to use downward pressure to get it to move. Use a file or heavy sandpaper with a backing stick to file to a little bit of a slope on the TOP edges of the three tabs on the new valve. This will help to keep it from binding on the under surface of the tank as you twist it into position when installing. Remove the new gasket and flap and liberally grease the tabs, the top and bottom gasket seating area, and the new gasket itself. Don't use petroleum jelly, it can affect some types of synthetic materials, so may not be good for the gasket. Plumber's grease is good, but other slick, but not too thick lubes will work. I used reloading case lube mixed and a water-soluble gel, but even some skin lotions, soap, or dish detergent combos would likely do. Clean the tank bottom where it will sit on the top and underside, and lube it, too. Pencil mark the tank about where the points of the opening are, and far enough out so you can see the marks with the valve in place. Mark the top of the valve gasket flange at the tab locations with something like a silver sharpie, so you can keep track of where the tabs are when you're rotating the valve into place. Determine which tab you will need to insert at which point in the tank bottom to get the flap where you want it after it's turned 60 degrees. Put the gasket back on the valve, and FIRMLY push straight down and rotate it about 60 degrees in the correct direction. Doesn't have to be exact, just use the markings to see that the marks on the valve flange end up about halfway between the markings you made on the tank. It can take some force to compress the gasket (that's why it helps to have the flap removed), so be sure it's compressed enough to turn without stressing the tabs, or you're likely to break off one or more and have to start with a new valve again. Don't wobble it as you work it into place. Reinstall the flap, fill tube, and pull chain.
M**C
as described, new, prompt delivery.
B**W
Works for Kohler Memiors Stately toilets w/ goofy triangular holes (read reviews for install tips)
First, I was worried when I popped my toilet lid off, drained the tank, removed the old, faulty valve, and saw a larger-than-expected, *triangular* hole (that meant my "guaranteed universal" kit wouldn't work). Next, I was worried when I ordered this item. Was it really the right part? And if so, what about all those reviews mentioning installation difficulties? But in the end? It couldn't have been an easier job. This was presumably due to me listening to all the previous reviewers who offered their best tips and tricks, e.g., (1) soak the gasket for 20-30 minutes, (2) lube it up (I used soap), (3) remove the flapper for now (reattach it when you're done), (4) make sure to (a) line the three points up with the triangular hole corners (some make pencil marks on the tank and corresponding marks on this item to line it up, I just eyeballed it) while (b) simultaneously ensuring that the orientation of the valve is a short clockwise turn away from being where you want it in the end, (5) temporarily lift up the gasket to kind of get it out of the way for now, (6) angle it downwards so that the first one or two corners slide under the bottom, (7) apply steady pressure while making sure not to break the corners, and when you feel it finally slide in, finagle the gasket back in place and, finally, (8) rotate the whole thing clockwise to lock it in place. Thanks for the tips, folks! Don't want to give anyone false hope - maybe I got lucky (Lord knows I was due)! - but it really was pretty easy.
G**V
Original part
Original part that fit perfectly.
C**L
Takes some finagling to get it in
I read reviews that said to use a silicon spray lubricant on the gasket and to test putting the main black part in the tank hole first without the gasket on to see how it works. I did that and also marked the widest parts of the hole in the tank with a pencil on the bottom of the tank and used a white marker (or grease pencil) to mark where the 3 tabs are on the top of the black piece so I could line them up. This step really helped! With the gasket off it took tipping the top of the main black part toward the front or back of the tank to get the tabs to go in. I took the red flapper off to get it out of the way. With the gasket back on I was able to tip back and forward and push down firmly to get the tabs to go through the hole being careful not to break the tabs. This took a couple of tries but suddenly it was in. Then slowly turn it counter clockwise to set it in place. With the flapper put back on and the chain hooked back in place I was done. Toilet Fixed!!
L**Y
Works great, but extremely hard to install.
N**A
La calidad del producto es buena
Fácil de instalar
C**N
Que resuelva el problema
Desgraciadamente no pude eliminar la fuga de agua. Posiblemente esta defectuosa la refacción. Tal vez me tocó mala suerte. Estoy esperando un plomero para ver si se puede solucionar algo o cambiar el wc.
A**R
OEM Replacement for a Kohler 1 piece Toilet
The product was a Kohler OEM flush valve replacement for a one piece toilet. The installation was more complex than it appeared because mounting inside the tank requires compressing a rubber gasket while twisting the assembly to engage the 3 anchor dogs.
M**B
Great Flush Valve
A replacement part for our Kohler toilet. Received it overnight and had it installed. A perfect fit and works well.
Trustpilot
1 week ago
4 days ago